Sunday, 23 November 2014

Finding the application pool account for a web application


I get a lot of questions from people who read my post on Configuring claims and forms based authentication for use with a SQL provider in SharePoint 2010 about how to find the application pool account for a certain web application.
  • The first thing you have to do is to find out what application pool is being used for you web application. In order to find this out we need to open up IIS (Internet Information Services) Manager. Click on “Start” – “Administrative Tools” – “Internet Information Services (IIS) Manager”.
OpenIIS
  • Open up the drop down on the left and look for your web application in the “Sites” list.
  • Select the web application you want to find the application pool account for and click “Basic Settings’ in the panel on the right.
BasicSettings
BasicSettings2
In my case the application pool for my web application is “SharePoint – Web Apps”.
  • Now we have to find the application pool account and we have two ways in which we can do this.
  • We can find the application pool account in IIS by selecting “Application Pools” in the left panel. This will show the list of application pools in the middle.
  • Find the application pool that you found in the basic settings of your web application. Right of the name of the application pool the application pool account is displayed. If you are looking for the application pool account of your Central Administration web application you can simply look to the right of the “SharePoint Central Administration v4” application pool. In my case the application pool account of my Central Administration web application is “SOLUTIONS\spfarm”.
ApplicationPools
  • If you know the application pool of your web application you can also find the application pool account from the SharePoint user interface.
  • In order to do this open up Central Administration and click on “Security”.
  • Now click on “Configure service accounts”.
CASecurity
  • In the drop down select the application pool of your web application. This will display the application pool account in the text box.
ConfigureServiceAccounts
  • If you are looking for the application pool account of your Central Administration web application you have to select “Farm Account” in the drop down box. The farm account is also the application pool account of your Central Administration web application and selecting farm account in the drop down will make the account show up in the text box.
That’s all there is to it!

Reference:

http://www.sharepointchick.com/archive/2011/10/29/finding-the-application-pool-account-for-a-web-application.aspx

People Search in SharePoint 2010


People Search is one of the great and useful features of SharePoint 2010. By using people search feature of the SharePoint 2010 users can find their co-workers not just by their names, by their hobbies, interests, department, job title, knowledge and expertise as well.

In this blogbost I would like to show you how you can enable the SharePoint People Search web part and customize it. So let's get started.

If you have a brand new SharePoint 2010 farm or you have not configure the search in your SharePoint 2010 platform, this is something you need to take care first. Here is how:

  • You need to visit the SharePoint central admin and locate your content sources under the search service application by clicking "Application Management", "Manage Service Applications", "Search Service Application" and "Content Sources".
  • If this is a new instance you'll probable have one item called "Local SharePoint sites". Please click this content source and edit.
  • In this page you need to make sure sps3://MySiteRoot item is in your start addresses list. 
  • You alse need to scheudle the full and incremental crawl in this page and check "Start full crawl of this content source" before clicking "Ok.
  • At this time you'll see the following screen:
Once this is completed, now you can insert SharePoint 2010 People Search Box web part into any page you desire. In my example I am placing the web part right into the SharePoint home page. 
  • First you will edit the page by going "Site Actions", "Edit Page"
  
  • Then you can select "Insert", "Web Part" by going "Editing Tools" ribbon.
  • You will chose "People Search Box" web part under the "Search" category of web parts. 


  • Once the People Search Box web part is added tot he page then we can configure the web part selecting "Edit Web Part" from the web part drop down menu.
  • While you are editing the web part, you can have scopes drop down menu and select which search scope you'd like to use and in which format. In this blog post since I will be showing the People Search, I am not including the "Scopes" drop down menu.
  • You can configure the Query Text Box, by assigning a label, fixing it's size, and defining the text box prompt string.


  • Query suggestions is a great way to display keyword suggestions to end-user while they are typing the query. These suggestion will be created automatically by SharePoint automatically based on certain number of click-throughs. There is a daily timer job scheduled to compile the suggestions. It is called "Prepare query suggestions" timer job and it is turned on by default.  If you are testing the keyword suggestions, you probably don't have any suggestion compiled yet. You can add these suggestions manually with power shell scripts. here is an example:
$searchapp = Get-SPEnterpriseSearchServiceApplication -Identity "Search Service Application"
New-SPEnterpriseSearchLanguageResourcePhrase -SearchApplication $searchapp -Language En-Us -Type QuerySuggestionAlwaysSuggest -Name "Jeff Armstrong"
New-SPEnterpriseSearchLanguageResourcePhrase -SearchApplication $searchapp -Language En-Us -Type QuerySuggestionAlwaysSuggest -Name "John Smith"
New-SPEnterpriseSearchLanguageResourcePhrase -SearchApplication $searchapp -Language En-Us -Type QuerySuggestionAlwaysSuggest -Name "Jennifer McDonald"
Start-SPTimerJob -Identity "prepare query suggestions"
  • There are many options to configure in miscellaneous section of the SharePoint People Search Box web part. Please refer to this TechNet article for further configuration options: Change properties for the Search Box Web Part (SharePoint Server 2010)
  • Once it is configured you can save the web part and save and check-in the page you are editing. This is how it will look like on the page: 

If you have done everything correctly and you have SharePoint publishing features enabled you will get a "404-Page not found" error because "peopleresults.aspx" does not exist in the Site Pages library. There are a few ways to workaround this issue. One of them is to create people results page manually. which is detailed in my other blog post called "People Search Results Return 404 - peopleresults.aspx is missing."
Here is how your results page will look like:


Reference:

http://sharepointtidbits.blogspot.in/2012/10/people-search-in-sharepoint-2010.html


Problem

I understand that SharePoint lists and libraries contain extra columns (i.e. Author, Description, Status etc) that can be used to group, sort and filter content items as needed. These extra columns are known as "Metadata".
I also understand that metadata is collected by SharePoint's search crawler and can be used in various ways by developers and administrators. I would like to understand more about this.

Solution

Crawled Properties: All the site columns(i.e. metadata) are picked by the Search Crawler based on the protocol handler used.
Notes:
  •  Site columns with blank data are not picked by Search Crawler. The site columns must have some content in order to be picked by Search Crawler as Crawled Property. In case, you run into this issue, add some content (at least 1 item) and do an incremental or full crawl.
  •  Search Crawls normally take a good amount of time if the amount of content is large.
Crawled properties can be seen in the Shared Services Provider’s Metadata Properties page. Launch SharePoint 3.0 Central Administration -> Select Shared Services Administration -> Select the Shared Services Provider -> In the Shared Services Provider, you can see the categories of the Crawled Properties by one of the following two ways:
  • Search Settings
  • Search Administration (if the Infrastructure Update is installed)
Click on any of those 2 links. Click on the "Metadata Properties" under the "Queries and Results" heading in the left navigation.
Click on "Crawled properties".
There are 11 crawled property categories that are available out of the box. You can see this to understand about all the categories. However, here we are interested in the SharePoint category.
Any crawled property that is prefixed with "ows_" comes from SharePoint. This is how it avoids conflict with crawled properties from other categories.


Content Sources: A content source specifies settings that define how and on what schedule content is crawled. It includes one or more addresses of a content repository from which to start crawling, also called "start addresses". These settings apply to all start addresses within the entire content source. Let us create a content source which can be used to crawl the site collection, which contains the Tips column data.
  • Click on the link "Content Sources" in the left navigation and then click on "New Content Source".
Create a content source. Give it a name and the start address of your site collection.
Click on the arrow next to the new content source you created and start a full crawl.
The crawl will take some time depending on the amount of data you have in your site collection
Keep refreshing the page until you see the crawl is complete and the status is set to "Idle".
Now, the crawler would have picked new site columns which has some content. Let us verify. Go to Crawled properties -> Sharepoint category. Search for the property "ows_Tips" (remember the crawler adds "ows_" as prefix to Sharepoint crawled properties.
Metadata Properties: The Metadata property mappings, map properties extracted from documents during crawls, called crawled properties, to managed properties that users can use in search queries. Now in order to use the "Tips" crawled property in a search, we need to create a metadata property and map it to the "Tips" Crawled properties
Click on Metadata properties in left nav. Click on "New Managed Property"
Give a name to Metadata property (in this example - Tips) and click on Add Mapping. Map this to "ows_Tips" Crawled property. Make sure that you check the box "Allow this property to be used in scopes". Doing so, will make this managed property available for search scoping (this will be explained later in this article).

Please note that after mapping the property, you need to do another crawl for the content to be picked. As you see in the figure below, the number of items found in this property shows 0.
After the crawl is complete, it will show the actual count as shown below:


Now the metadata property is ready for searching. There are various ways you can use the metadata property for search requirements. A few options include Basic search, Advanced search, search query etc.
Use in Search scope:
Go to Site -> Site Actions -> Site Settings -> Modify All site settings -> Click on Search scopes under Administration.
Click on create "new scope".
Create a scope (Tips).
Now we will have to create a rule for this scope. Click on Add rules.
You can use the property query option to set rules specific to the metadata. For example, let us say we want to search only content which has the Tips column value equal to "Indexing".
Please note that only those properties are shown in the drop down, which have its crawled property set to "Allow this property to be used in scopes" (as explained above).


After you click OK, the scope takes some time to get updated.
After the scope is ready, you can see the number to items available under this scope.
As you can see below, this search scope is available in the basic search scope dropdown.
Now going forward, whenever data is added in the list, only an incremental crawl is required for it to be available for searching. For example, let's add one record in the list as below.
Go to search SSP Admin -> content source and do an incremental crawl.
It should be quicker than a full crawl as it just has to pick the changed data from the last crawl instead of crawling the all of the content.
After the crawl is complete, you can go to the scope and see that the count has been increased to 2.
Use in "Advanced Search": Metadata properties can be used to narrow down search results in Advance Search. As you see in the figure below, the Tips scope is available under "Narrow the search" section.
We can also add a custom property restriction in Advanced Search. To do this, we need to modify the advanced search property XML statement.
Please remember to add both the PropertyDef and PropertyRef nodes. It is recommended to edit the XML in Visual Studio or some XML editor.
Use in a custom search query: These metadata properties can be used as columns when writing search queries (either through the API or the search web service). Below is an example for a search query using FullTextSqlQuery
Planning search is an important part of any Microsoft Office SharePoint Server 2007 deployment. If you devote time to plan how search is implemented, you can save time in the future and can reinforce the effectiveness of other business processes. For targeted and large environments, Metadata and Crawled properties are key pieces to SharePoint search.

Next Steps


Reference:

http://www.mssharepointtips.com/tip.asp?id=1177&page=1

Configuring "Alternate Access Mappings" at SharePoint 2010


Nice article by Bruce Tuncertan, very easy to understand


Once you have your SharePoint site up and running you may want to add/change the URL of your SharePoint site. In very basic terms here how you can accomplish this.

When you want to change or add new URL to your existing SharePoint site.
First thing you need to do is to make sure that the new URL is in your DNS settings. I mean when you ping the new URL it should ping the same IP address of your existing SharePoint site URL.
In my case since I have a single server installation on my desktop all I needed to is to add the new URL to my "hosts" file.

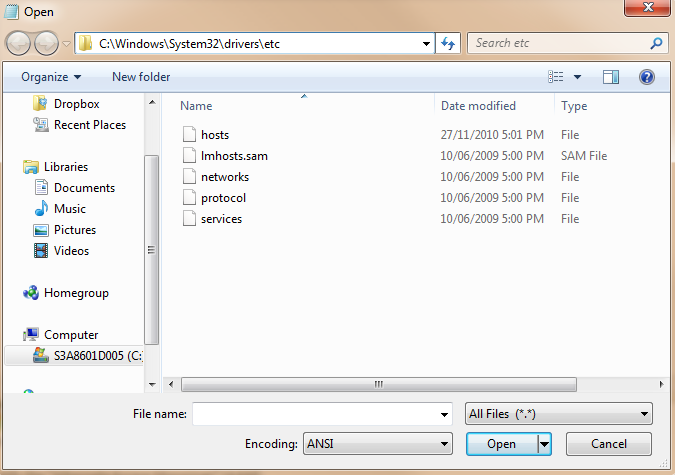
In case if you don't know where is your hosts file here are quick steps for you to get that done. 
 
 
https://blogger.googleusercontent.com/img/b/R29vZ2xl/AVvXsEhF_f8kq8U9AC80oyp5RXhkB5SPsUF0xBhkdL3uawadXCp5FWX0PKL2YoL4rxX-gQNH92hPaD_s1rwkBjcyKEyoOtUSlQNje2RwjH_A7LI_jla2qThG70weGlYt5hhEZC_x1EreUL4LlOOx/s1600/How+to+run+Notepad+as+Adminsitrator.png 


  • Open a Notepad (or any other editor) in "Administrator" mode
  • Then go to File->Open and open to "\Windows\System32\Drivers\Etc\Hosts" file:
 
https://blogger.googleusercontent.com/img/b/R29vZ2xl/AVvXsEjeUK2AWeOWZhz7wJr_-SuM_NoX3aql2Qd9oNL78Am-4w3k29mp7DCmWUpkIiovAf2TFo9D5PXgP_VpDwi_dFoISnEWHdsMy1MSFME8jtJZs7Pa0VfTPnw5-EceAGGi0E9uNkOOptQV7WY_/s1600/Open+hosts+file.png 
 
  • Add the IP address and the destination to the end of your hosts file. In my case I added "127.0.0.1        SharePointTidBits" right to the end.
  • Save and Close.
  • If you have an environment controlled by a DNS server you should add new name to your existing DNS Servers either "A" or "CNAME" record.


Once we handled the DNS/hosts modification then we need to add or modify the "Alternate Access Mappings" (AAM).

Go to :
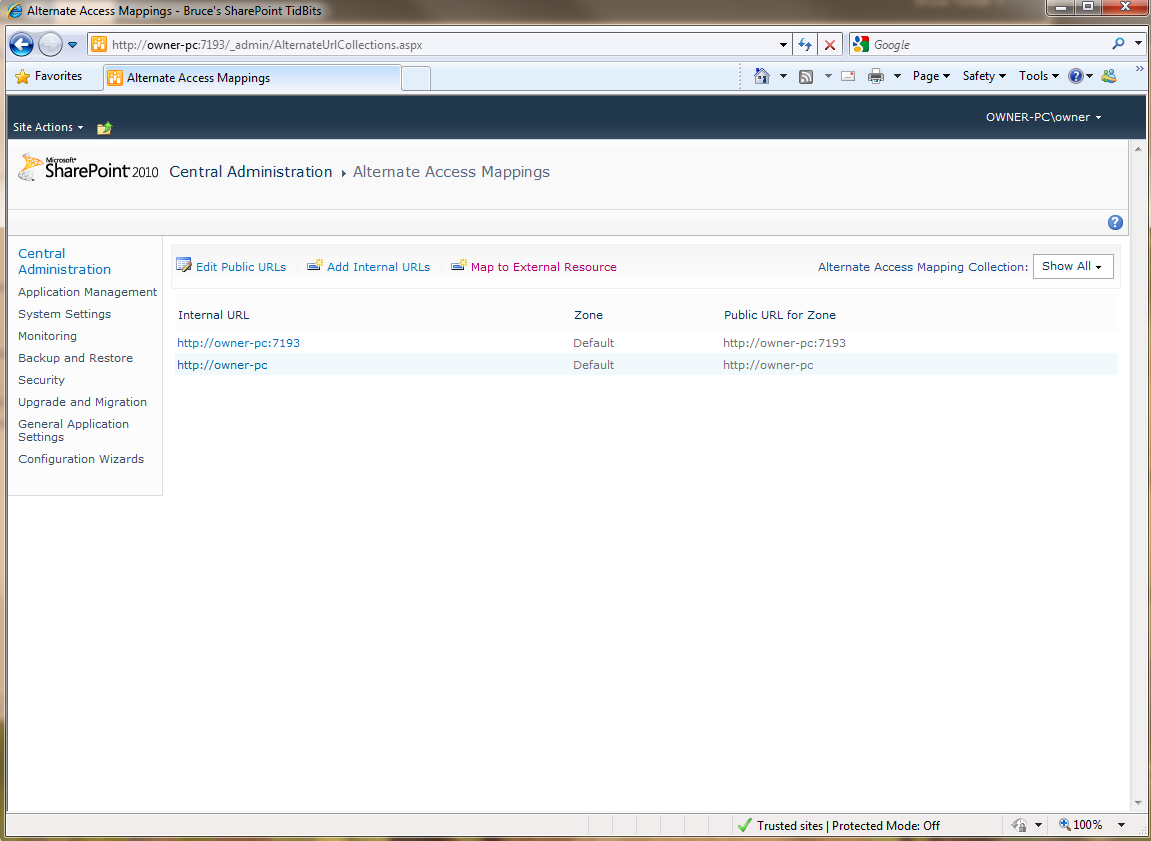
Central Administration -> System Settings -> Configure Alternate Access Mappings. 
 
https://blogger.googleusercontent.com/img/b/R29vZ2xl/AVvXsEh27145lKQHzhCGId3Lo_McaXzpquP5f21YX4qRsqcWhRa8r_u1yIvvNhhTWFNkQhqSp9yoUG7l706KX65iYxKOVdRMj6yQ5NnIPDK9PsBkUp9pWIK2-FOUul-PWyoIKJi6fnH95ON_WF8W/s1600/SharePoint+CentralAdmin+Alternate+Access+Mappings.png 
 
Then you click to "Add Internal URLs"
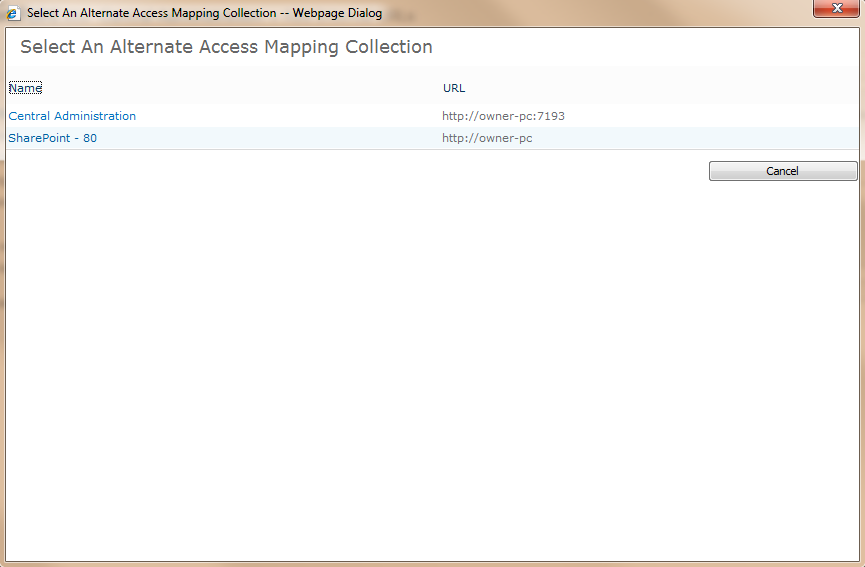
Please select the correct "Alternate Access Mapping Collection". This will be the your site you’d like to add/change the URL. Click "Alternate Access Mapping Collection":
 
https://blogger.googleusercontent.com/img/b/R29vZ2xl/AVvXsEj4okZFWDikxOKBO76djdhwhSM4QgnjB3Js6vuL0ejmtVVnOPJnomlcTmMo4gkv7cgWk3_lX114xAERefkjwEP1-PZxzzfpY29WN6hbN86NjWA0xlM6Qf9OKocG7t4HVZGqLZhOdq-1tyjb/s1600/SharePoint+CentralAdmin+Alternate+Access+Mappings+SIte+Collection+Selection.png


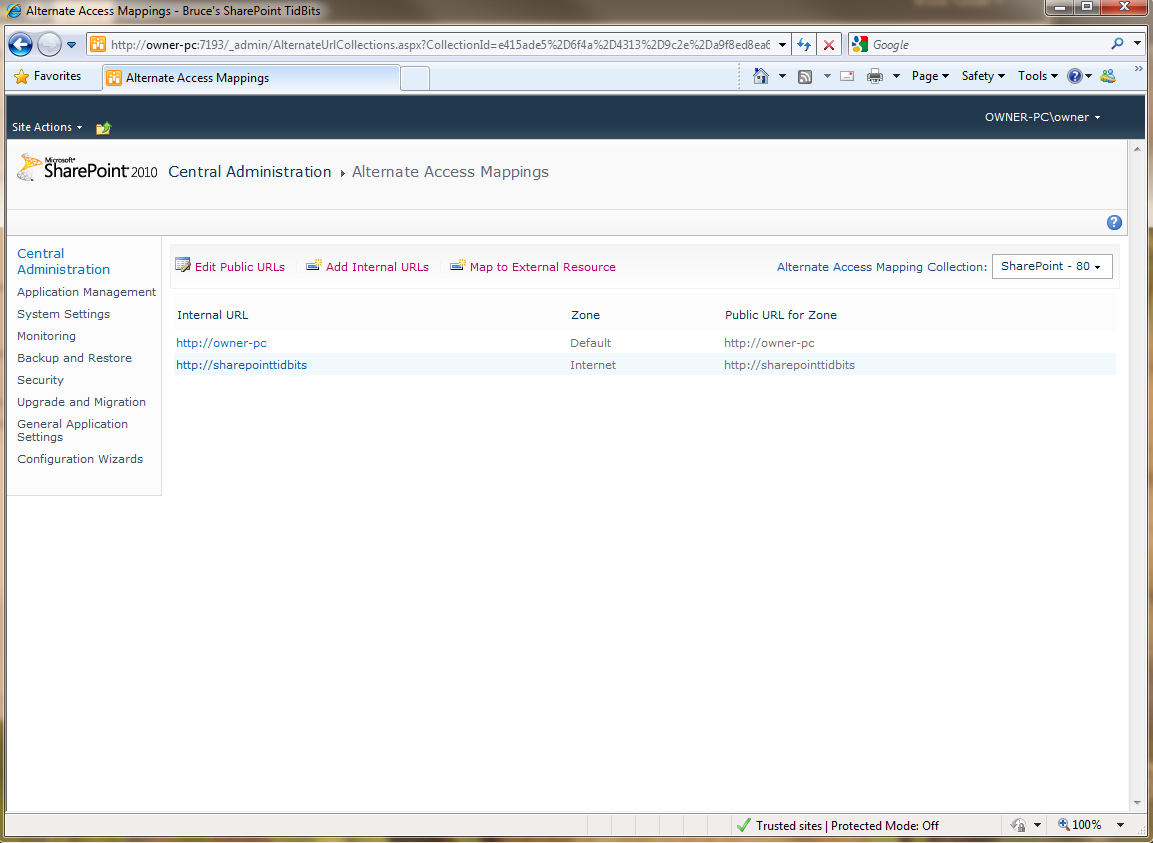
In my case I select "SharePoint - 80" and I enter the URL I would like to add to the appropriate zone which in my case it is my Intranet.
 
https://blogger.googleusercontent.com/img/b/R29vZ2xl/AVvXsEi3F7v8CSPDLpIJdZaoPwOm_WcVqw5HKfE7f3YgM9Yexgdhycvz-Hj0Kni5HL7s3sJONzOboud5zsaBj7btIVVUZ8QhDGS467obh7xPN7y0Iq5njbdoL-qhHYfg1n1FnCf1O_jlSY2ejmPu/s1600/SharePoint+CentralAdmin+Alternate+Access+Mappings+Intranet+Site+Added.png 
 
Then I click save and here we go:
 
https://blogger.googleusercontent.com/img/b/R29vZ2xl/AVvXsEj3VUVc54YA0XiRlqeqKKLI4n6PKkGkeBdlwBNy6sDTXXTN0reM7HtIerdA-xjIHamHRBSJDFsSbvERxUCwVZugcOYkyi8WMDreT54Hv1LWGxkyidQb54P70uTKf-UdNegtuyJJXC1242SU/s1600/SharePoint+CentralAdmin+Alternate+Access+Mappings+Site+Added.png 
 
You think that its that easy, isn't it?
It should be but in my case when I try to access to the new URL "http://SharePointTidBits", IE is keep prompting me the user name and password.

Here is what I need to do to solve this issue:
  1. Click Start, click Run, type regedit, and then click OK.
  1. In Registry Editor, locate and then click the following registry key: HKEY_LOCAL_MACHINE\SYSTEM\CurrentControlSet\Control\Lsa\MSV1_0
  1. Right-click MSV1_0, point to New, and then click Multi-String Value.
  2. Type BackConnectionHostNames, and then press ENTER.
  3. Right-click BackConnectionHostNames, and then click Modify.
  4. In the Value data box, type the host name or the host names for the sites that are on the local computer, and then click OK.
  5. Quit Registry Editor, and then restart the IIS service.

Tadaaa!
 
 
https://blogger.googleusercontent.com/img/b/R29vZ2xl/AVvXsEh06lDel8OpScl5IwgPAkbkK5hqoZv5sQOhQ1EXX3rAKrs0sr2HmyK7DkkhnlnYdBLi12UIf8suG0SfgvpWq8aUhOgQIwgtCDbo7Zvq54mB-kX0jPAEf5dQFcwOwaexqLToBQs7IWoI8M_A/s1600/Bruces+SharePoint+TidBits+Alternate+Access+Mappings+Site+is+Working.png


Reference:

http://sharepointtidbits.blogspot.in/2010/11/once-you-have-your-sharepoint-site-up.html