Tuesday 24 June 2014

How to do SharePoint 2010 Content Deployment

Good Article by Melick

http://www.codeproject.com/Articles/275792/How-to-do-SharePoint-Content-Deployment

There are many articles in the web by describing Content Deployment in SharePoint 2010. But most of the time (In my case it do not work fine always in first time Frown | :-( )  it is not working property and giving plenty of errors which direct us to restoring the backup rather than trying Content Deployment in the SharePoint Server.
Here I'm going to my experiences and how I'm resolving those errors and little bit of background about the  SharePoint Content Deployment. Luckily i have manage to successfully proceed with the SharePoint Content Deployment most of the time.

What is SharePoint Content Deployment 

Content deploy can be use to export (deploy) content from one site collection to another site collection. content deployment is taking care of following contents in the source site collection.
  • Web pages – Deploy corresponding images styles , master pages and etc.
  • libraries
  • lists
  • resources
Content Deployment do not deploy
  • programs
  • assemblies
  • features
  • configuration information(Web.config)
Most of the time Content Deployment fails due to features. in the later i will explain how to over come these issues.

How to Configure SharePoint 2010 Content Deployment

We will use following scenario for the deployment
image
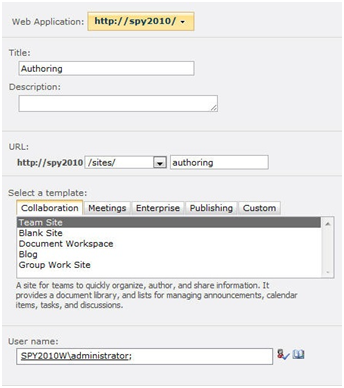
First you need to create a site collection in the production server (Our One is production/sites/ALR) which you are going to use in the content deployment.
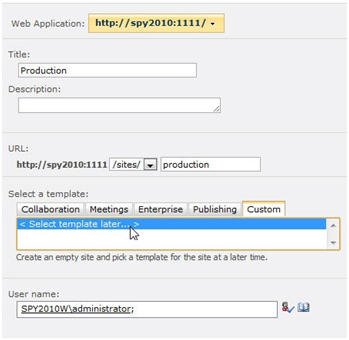
When you are creating I'm always using site template as Select Template Later in the Custom Tab.You can use the blank template also but I'm recommending this one  because this one worked for me  all the times.
image
After that you need to configure content deployment
For than go to Central Administrator –> General Application Settings–> Configure Content Deployment in the Production Server
image
go to this and 
  • allow Accept incoming content deployment jobs in Accept Content Deployment Jobs section.
 image
  • select Do not require encryption  in connection security.(If you want you can use https also. but for the moment select the other one. )
image
Then Go to Development Server and proceed following steps to configure deployment path and job.
First we need to Configure Deployment Job. For that Go to Central Administrator of the development machine and then General Application Settings and  then Configure content deployment paths and jobs.
image
then select New Job to create new content deployment job.
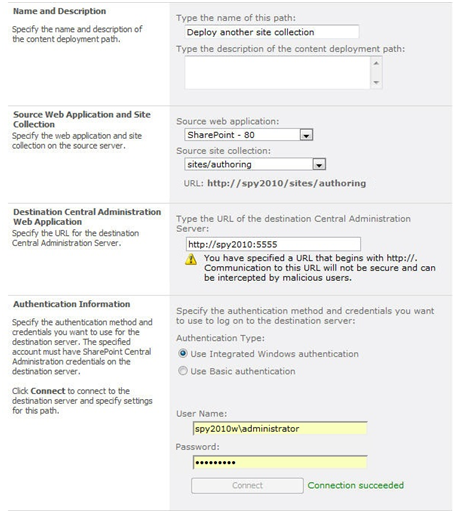
Then Specify Title and Description (Optional) and for the source application select Source Web Application as Development and Source Site site collection  as  /sites/ALR ( this is as per scenario you can choose your one)
then you need to give production server Central Admin URL with the Port to Destination Central Administration Web Application. here i found that some times we need to give the with IP addresses. but most of the time URL will work.
image
Then we need to provide authentication information. here most users are failing in this point (I were also). because what ever the selection we made we have to provide user name and password. Earlier i thought if we select windows authentication it does not need but it is not. Following shows sample values for  Authentication Information
image
after that select the destination Web Application and Site collection in Destination web application and site collection section.
image
For the moment leave Deploy User Names selected and Security Information All.
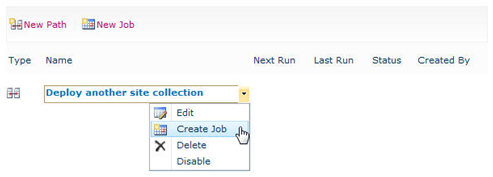
The SharePoint Automatically Create a Quick Deployment Job for you.
image  
For the moment leave this and create a Deployment Job by right clicking the Deployment Configuration.
image
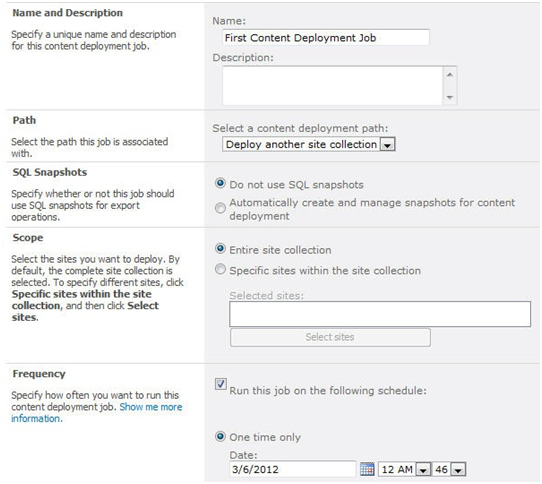
Here you can schedule the content deployment but for the movement select following options but of cause you can change them as you want later.
SQL Snapshots --> Do not use SQL Snapshot
Scope --> Entire Site Collection

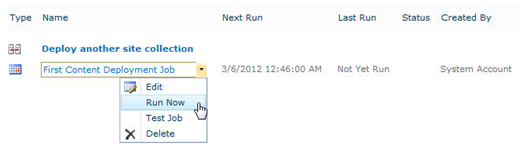
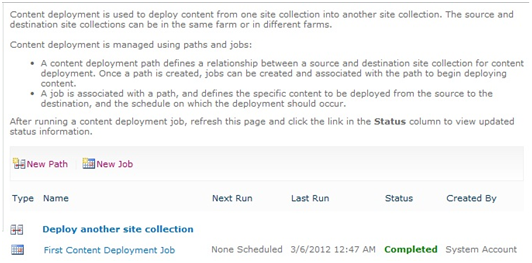
the clink and finish the job creation. then you will see following kind of a menu.
image
Now the hard part comes. In the Menu Click Run Now or Test Job. (I’m Recommending Test Job before actually run the Job. Because some times Run Now deploy content partially and failed thus better to Test the Job before it is actually run. ) Then Most of the Time you will get Test Failed. If Not you are very lucky, thus you can proceed with the Run Now. But if you get Test Failed (sure you are Smile | :) ) Following are the workaround you can fixed those errors.

Following are the most common errors you are getting..

Could not find Feature someFeature.
This error coming because this feature is not in the Production Server. Thus Install the Feature to the production server and run the Test Job again, then it will say another feature is missing thus keep on adding or removing unnecessary features in the development machine until it get succeed. You can find more feature details by using  power shell commands (click here).  
Could not find Feature FT-01-bbb35132-7695-139b-2e18-27444285e766.
These features are InfoPath Form Template Features. Thus get the relevant Form template and upload it to the production server.  The run the Test Job and see the progress.
If every thing finds most of the time you are getting these kind of errors.
  • An unexpected error has occurred
  • A list, survey, discussion board, or document library with the specified title already exists in this Web site. Please choose another title.
  • Unable to import the folder _catalogs/fpdatasources. There is already an object with the Id d029169b-1f86-4275-bb99-dd78a48f7952 in the database from another site collection.
These errors are coming because content database is having these objects and those are orphan in the site collection. thus you can repair the content database to delete these orphan objects in the particular site collection. 
thus you can use following power shell command to get rid of these errors (click here).

Content Deployment in SharePoint 2010

Nice Article by Archana Sarodia

http://www.e-zest.net/blog/content-deployment-in-sharepoint-2010/


This is part of the Enterprise Content Management in SharePoint; which addresses the feature of moving the Contents from Source Site to Destination Site.
Content Deployment
The complete Site collection can be Deployment or Subset of the Site can be deployed. This is an Incremental Process which deploys only changes and related resources to the destination Site. Quick Deploy feature allows single page deployment by the Author.
This is a one way process where in data is transferred from Source to Destination; so if any change is made in Destination Site those would be over written by this Deployment Process., also sometimes the process of Deployment may fail in case new Content is added or existing one is changed. Considering this it is recommended that the Destination Site has Security by which User is not allowed to directly access and change content in the Site.
Deployment includes:
  • Web Pages along with Images, Style sheet and layout page
  • Libraries
  • Lists
  • Resources used by the page
Deployment excludes:
  • Assemblies
  • Features
  • Configuration Information ie Web Config
Latest feature of Content Deployment in SharePoint 2010 is use of SQL Server Snapshot. In this option the Source Content Database snapshot is taken before the job starts.
Note: Quick Deploy option will work when the Source site Collection is using Publishing Portal Template or SharePoint Server Publishing Infrastructure feature enabled.
Deployment Paths and Jobs
Content Deployment Path defines the Source Site collection from which the deployment start and the Destination Site Path is the Collection to which content is deployed.
Other information associated is:
  • Authentication information of Destination Site
  • Deployment User name that are associated with the Content like the Author name
  •  Details of the Permissions to be deployed on the Content
Content Deployment Job defines the schedule of the Deployment Process for specific schedule and Path. A path can have multiple Jobs defined for Deployment.
Other information associated is:
  • Path to which it is associated
  • SQL snapshot used or not
  • Sites from Source to be deployed
  • Frequency of the Job
  • If notification to be sent on success of failure of Job with the e-mail ids
Types of Content Deployment Jobs:
  1. Incremental
  2. Full
  3. Quick deploy
Content Deployment Security
Permission on Destination and Source Server may differ; majorly the destination Server would have Active Directory Authentication; we may not have relationship between the 2 Servers.
Security Options while setting Content Deployment Path:
  1. All
  2. Role Definition Only
  3. None
How Content Deployment Works
Content deployment settings for Source and Destination Server can be configured for acceptance and rejection of incoming Content Deployment Jobs. You can specify the Servers from which the Content are to be accepted or destination Server for Outgoing data. Web service is the communication way between Source and Destination Server.
Following are the Steps from Start to Finish for Content Deployment Job:
Step 1) Check Change Token to identify when last successful Deployment was done. If the time difference is significant then the Jobs opt for Full Sync even if setting is for Incremental Update. Once verified the Deployment process starts; if snapshot option is selected then SQL Snapshot is taken
Step 2) Contents for the Deployment are identified and copied to a temporary folder and packed as .cab files. The Source Server is authenticated by the Web Service on the Destination Server; once authenticated the Web Service are called for Import on Destination Server.
Step 3) The .cab file from Source is copied to Destination Server temporary folder and Web Service is called to start the Import Process
Step 4) Content Deployment Job calls Web Service to check status of Import; if receives no response on Import within certain time; job will contain warning for Time Out of Job. Job requests for status eventually fails or re-runs the Job
Step 5) .cab file is extracted in the Temporary folder and imported on the Destination Server.
Step 6) On completion of Import either Success or Failure message is sent to the Central Administration Server. If success the changed token is saved else discarded for save.

Using Content Deployment to Copy One Site Collection to Another in SharePoint 2010

Good Article on Content Deployment by KC Young

Using Content Deployment to Copy One Site Collection to Another in SharePoint 2010


In simple terms, Content Deployment in SharePoint 2010 is used to deploy the content from one site to another site. We can set the content deployment jobs (incoming and outgoing) using SharePoint Central Administration 2010.
The two-farm topology is a standard Internet site topology and is typical of topologies that are used to publish an Internet site. It is usually composed of two server farms: one to host the authoring site collection and the other to host the production site collection.
It is important to be aware that content deployment is a one-way process. The content deployment feature does not support round-trip synchronization from source to destination and vice versa. Creating new content or changing existing content on the destination site collection can cause content deployment jobs to fail. Because of this, it is usually recommended to restrict permissions on the destination site collection so that only specific users can make direct changes to content that is stored within that site collection.
We will now go through a typical process that will copy one site collection to another with content deployment.
PROCESS OVERVIEW
Content Deployment in SharePoint 2010 is composed of the following three processes.
  1. Create two Web Applications in separate content databases and create site collections in the web applications.
  2. Configure Content deployment, paths and jobs -> Run jobs.
  3. Check the deployment status and the destination site collection’s content.
I. CREATING THE WEB APPLICATIONS AND SITE COLLECTIONS
1. First, create two web apps and ensure the two are in separate content databases.
  • http://spy2010
  • http://spy2010:1111
2. Second, create site collection http://spy2010/sites/authoring and select the “Team Site” template.

3. The initial content deployment destination must be a blank site collection.
4. Create a site collection and ensure that you select “<Select template later>.”
Note: DO NOT create a site collection using “Blank Site” template, as this does not count as an empty site collection and content deployment will fail.
5. The site collection in port 1111 is just http://spy2010:1111/sites/production.

II. Configure Content deployment, paths and jobs in CA
1. Navigate to Central Administration -> General Application Settings -> Content Deployment -> Configure Content Deployment.

2. Configure new deployment path

Note: A content deployment path is required to define a one-to-one relationship between a source and destination site collection for the purposes of content deployment. Once you have created a path, jobs can be scheduled and run on an ad-hoc basis to deploy additional content as required.
3. Select your “authoring” site collection as the source and “production” site collection as the destination.
4. Enter the current central administration address, including the port number.
Note: We will need to test the connection to make sure the destination site collection list populated correctly.

Create a deployment job and run it
5. We will need to create a deployment job. Jobs and deployment paths have a one-to-one relationship, so we will need to create at least one job for each path that we have specified.
6. Select the “One time only” radio button to kick the job off immediately.

7. Create a schedule or run the job now using the “One time only” option to test your new deployment path.

8. You can view current job status on the “Manage Content Deployment Paths and Jobs” page.


9. Once the job status becomes “Completed,” the “Production” site collection’s content has been copied successfully.

III. Check deployment status and destination site collection’s content
1. Navigate to Central Administration -> General Application Settings -> Content Deployment -> Check deployment of specific content.

2. We can check the “production” status on the following page.

3. When we login to “production,” we can see that the content is now same as the content in “authoring.”


Friday 13 June 2014

Creating a custom sequential workflow in SharePoint 2010

Nice Article by Kalyan

http://www.techbubbles.com/workflowfoundation/creating-a-custom-sequential-workflow-in-sharepoint-2010/

SharePoint supports state machine and sequential workflows. In Sequential Workflow the activities are placed in logical order with a start and an end. Sequential workflows can be used in automated processes where a manual interaction like moving documents to library. In SharePoint, Workflows can be associated with libraries, lists and sites. Site workflows are introduced in SharePoint 2010 and they exist at the site level and can act on all lists and libraries associated in the site. This post outlines the steps to create a sequential workflow in SharePoint.
Create a list and instantiate the workflow automatically when an item is inserted to a list and flow through the process.
1. Create a list in SharePoint called Credit Approval which contains the below three fields
Field Name Data Type Required
Credit Requested Amount Currency Yes
Employment History Choice (Good, Bad and none exist) Yes
Credit History Choice (Good, Bad and none exist) Yes
2. Launch the Visual Studio  2010 and create a new Sequential Workflow as shown below
image
3. Name the workflow project name and say ok. Visual Studio selects the available SharePoint site on the machine and select deploy as Farm Solution in next step
4. Provide a name to workflow and select List Workflow for the workflow template
image
5. Click next to select the list association and task list and workflow history list
image
6. Check how do you want the workflow to start?
image
7. Click Finish button and Visual Studio generates the necessary files. Add LogToHistoryListActivity activity below onWorkflowActivate activity and set the properties as shown below
image
8. Drag an If-else activity to the designer below the logWorkflowStarted activity. Add other activities as shown below
image
9. Select the code condition in properties window for CheckEmploymentHistoryActivity and add the below code
image
10. Now Deploy the project and browse the list in SharePoint and save an item to the list. As there is no user interaction workflow completes and shows as below
image
11. Click on the Completed status of the workflow to see the workflow history.
image
12. After Deploying the workflow to SharePoint then you can then associate it to list , content or site in two ways
  • Manually by using SharePoint interface
  • During the feature activation via feature receiver
13. Navigate to the list settings –> Workflow settings of the list then you need to associate a workflow as shown below
image
click on the Add a workflow link to add a new workflow as shown below
image

Custom Approval Workflow in SharePoint

Good Article by Muruges

http://intelliview.blogspot.in/2012/08/custom-approval-workflow-in-sharepoint.html

Download code from here
This workflow was created for beginner those wanted to learn the custom workflow in SharePoint from very scratch level.
Even I have created many complex workflows for my work in the past,I feel its time to introspect my knowledge on this simple workflow.
As I follow the many instruction those available in forums and blogs,I end up with confusion and if I wanted to apply my own business requirement out of this instruction,it was very tedious.
So here is the simplified version of my "Custom Approval Workflow in SharePoint using Visual Studio 2010".
Debugging is always enlighten you to apply and learn the secret of the workflow engine. Create a blank SharePoint project and add the new item from project template "Sequential Workflow".
On this design surface add the activities just like you seen here.
The workflow engine manage the following activities such as "Creating task and assigning to someone,after the task has been assigned to someone monitoring the status of Tasks(approved or rejected) and completing the task. Many times I was confused and identified the reason for it,assigning the correlation and Task Properties and Task id via "Property Window". Of course this will be useful for advanced developer[I personally feel those knows all properties of the task and workflow and how to apply these to their business requirement]. For simplicity I am going to create all properties behind the code and assigning to design surface. Required properties here I have created so far globally.
        public Guid TaskID = Guid.NewGuid();
        public SPWorkflowTaskProperties taskProp = new SPWorkflowTaskProperties();
        public SPWorkflowTaskProperties afterProp = new SPWorkflowTaskProperties();
        public SPWorkflowTaskProperties beforeProp = new SPWorkflowTaskProperties();
        public bool isComplete = false;
// This is nothing but "Task ContentType's" field "Status" GUID.
//You can find it by debugging the code line,You can find all field's guid and its value.
//HashTable tbl = afterProp.ExtendedProperites;
        public Guid idStatus = new Guid("c15b34c3-ce7d-490a-b133-3f4de8801b76");

Now we need to assign these properties to design workface.Once you created all these properties on code behind,you can see like this
Important tips to remember: Correlation token for task activities must be same throughout the workflow. So I am renaming the correlation token for my "CreateTask1" as taskToken. Assigning the Owner Activity to "Workflow1" just like below screenshot.
follow the same to all activities "OnTaskChanged1" and "CompleteTask". Secondly,We need to assign the unique GUID for task this one also common for all activities. Right click on CreateTask1 activities -> Properties and choose the "Task Id" click on the button and choose our own created "TaskID" for the task id. like shown here. And do the same for "Task Properties" too.


Here I am creating a method called "createTaskAndAssign".
private void createTaskAndAssign(object sender, EventArgs e)
        {

            taskProp.Title = "Type the title";
//Later you can try the dynamic title text may be workflow item's title using workflowproperties.
            taskProp.AssignedTo = "local\\administrator";
            taskProp.Description = "Please review";
            taskProp.DueDate = DateTime.Now.AddDays(2);

        }
Assign the above method to "MethodInvoking" properties of the "Create Task1" activity. For whileActivity you can manage your condition using "Code Declaration" or "Declarative Rule Condition. I have used "Code condition" you just need to assign the method name[CheckTaskStatus]to "Code Condition properties of "While Activity".
private void CheckTaskStatus(object sender, ConditionalEventArgs e)
        {
            e.Result = !isComplete; //When true - workflow ends up.
        }

Created a method for "OnTaskChange1" activity and assigned the same as did for while activity. This method will check the task content type's task status field value by using the task class's "ExtendedProperties".
 private void onTaskChangedInvoked(object sender, ExternalDataEventArgs e)
        {
            string tbl = afterProp.ExtendedProperties[idStatus].ToString();
            if (tbl.Equals("Completed"))
            {
                isComplete = true;
            }
            else
            {
                isComplete = false;
            }

        }
As soon as the boolean value set to true,the workflow calls the "Complete Task" activity and ends up its cycle. To test this demonstration on your development server,create two user for your sharepoint site and assign the task for them. And log in as different user by using new user check the "Task" list on their log do approve or reject and see the workflow status.

Reference:

http://intelliview.blogspot.in/2012/08/custom-approval-workflow-in-sharepoint.html

SharePoint Foundation 2010 Visual Studio Approval Workflow

Good Article explains step by step by Adil

http://dotnetadil.wordpress.com/2012/05/29/sharepoint-foundation-2010-visual-studio-approval-workflow/

  1. The scenario is that a document library has a column of type option named WorkFlowLevel. Level -0 means that the document is approved automatically by the uploader and Level -1 means the document can only be approved/reject by a person who is in the Approver groups.

    Column

    Approver groups
  2. The final workflow is as below:-
  3. To create such solutions fire up the Visual Studio and select a Sequential Workflow template, and set the solution settings as below


  4. First code is to define the OnWorkflowActivated event .
  5. Then connect this method to the activity on the designer
  6. Next go to the Toolbox, under the Window Workflow v3.0 tab drag and drop the ifElse activity just below the previous activity and then define the code to execute.
  7. Associate the above code to the left if branch (if the condition return true then this side will fire, if it false the right side will automatically fire)
  8. If true, the left side will execute a code (see below) that will email a document approval request to all the member of the Approver groups
  9. Drop the send email activity and associate the above code.
  10. Now we are going to use the while loop that will loop until the Approve Status is equal to Approved or Reject.
  11. Associate the while loop with the code below
  12. Inside the while loop drop the OnWorkflowItemChanged activity and then define the code before associating the two.

  13. When the document have been approved or rejected, the loop will break where based on the status we will send the email to the document creator. Drop the ifElse activity just below the while loop.
  14. Below is the email code for sendApprovedEmail
  15. One last part of the workflow is the right hand side, where the document does not require any approval. The approval status is automatically set to Approved.
  16. For that, just drag and drop the Code activity from the Toolbox inside the else activity and associate the ExecuteCode.

  17. To approve a document, the user needs to have at least Design permission level. Even though the workflow can be triggered by user that has permission other than Design which by right the code should be elevated. Here we are not elevating anything since unlike SharePoint Designer workflow which runs under the user
    who triggers it, a Visual Studio workflow will always run using the System Account (that means Full Control).
  18. Oh, by the way the link in the email will open the below page (Item Display Form).


    Reference

    http://dotnetadil.wordpress.com/2012/05/29/sharepoint-foundation-2010-visual-studio-approval-workflow/