Saturday 29 November 2014

How to Enable Office Web Apps on SharePoint 2010


Office Web Apps are the online companion to Word, Excel, PowerPoint and OneNote applications that allow users to access documents, from anywhere. If you are going to use SharePoint 2010 in your organization, it allows you to do basic editing of word document without needing to install the Office Suite on client machines.

System Requirements:

- Microsoft Server 2008 R2
- Microsoft SharePoint Server 2010 or Microsoft SharePoint Foundation 2010
- Microsoft Office Web Apps.
If you have installed the above products, just follow these simple steps:

I. Starting Office Web Apps Services

1. Go to Central Administration -> Application Management.
2. Click on “Manage service applications.”

http://www.boostsolutions.com/blog/wp-content/uploads/2012/07/PIC1-How-to-Enable-Office-Web-Apps-on-SharePoint-2010.png

3. Not all the menus are displayed in ribbon Menu format, which was first introduced in Office 2007.
4. Click on New -> Word Viewing Services.
Note: You can choose PowerPoint or Excel also, steps are same.

http://www.boostsolutions.com/blog/wp-content/uploads/2012/07/PIC2-How-to-Enable-Office-Web-Apps-on-SharePoint-2010.png

5. A pop-up window will open.

http://www.boostsolutions.com/blog/wp-content/uploads/2012/07/PIC3-How-to-Enable-Office-Web-Apps-on-SharePoint-2010.png

6. Enter a name for this service. In this instance, we used “SPB Word Viewing Service.”
7. Select “SharePoint Web Services Default” under Use existing application pool.
8. Next, make sure the “Add this service application’s proxy to the farm’s default proxy list” checkbox is checked.
9. Click the “OK” button.

http://www.boostsolutions.com/blog/wp-content/uploads/2012/07/PIC4-How-to-Enable-Office-Web-Apps-on-SharePoint-2010.png

10. This will install all the Office Web App services required.

II. Activate Office Web Apps in Site Collection

1. Go to the site which you want to activate this feature.
2. Click on Site Action -> Site Settings -> Site Collection Administration -> Site collection features.
3. Activate Office Web Apps service.

http://www.boostsolutions.com/blog/wp-content/uploads/2012/07/PIC5-How-to-Enable-Office-Web-Apps-on-SharePoint-2010.png

III. Making sure Office Web Apps is Working

1. Select any office document you have and click on the drop-down menu which appears when you mouse over it.
2. If you see “View” or “Edit” in Browser as menu item, your Office Web Apps has been configured correctly.


http://www.boostsolutions.com/blog/wp-content/uploads/2012/07/PIC7-How-to-Enable-Office-Web-Apps-on-SharePoint-2010.png


Reference:

http://www.boostsolutions.com/blog/how-to-enable-office-web-apps-on-sharepoint-2010/


Installing Office Web Apps: Existing SharePoint 2010 Server Farm


Nice Artcile by Michael Mukalian explained step by step

I just got done doing this a couple times, so I wanted to just throw out there steps with pictures.  The installation process is pretty much from the Deploy Office Web Apps (Installed on SharePoint 2010 Products) TechNet article, but I wanted to show images along with each step.  So, with that said, here we go:
1. Download the Office Web Apps install from wherever you've access to it (it's a seperate download in the MSDN area), and then run setup.exe.
2. Enter your Product Key when asked for it

3. Accept the Software License Terms and click <Continue>

4. Select a file location then click <Install Now>

5. Watch the progress bar scroll :)

6. When the installation completes you'll be prompted to run the Configuration Wizard.  Make sure the checkbox is checked to do so, and click <Close>

7. Click <Next> on the Welcome dialog

8. Click <Yes> in the Service Reset Notification dialog

http://www.mukalian.com/blog/image.axd?picture=2010%2f11%2fOfficeWebApps7.png

9. Click <Next> in the Completing dialog

10. Watch another progress bar :)

11. Click <Finish> in the Successful Configuration dialog

12. Alrighty then, the bits are installed so time for configuration...fire up Central Administration from Start --> All Programs --> Microsoft SharePoint 2010 Products --> SharePoint 2010 Central Administration 

http://www.mukalian.com/blog/image.axd?picture=2010%2f11%2fOfficeWebApps11.png 

13. Click the Manage services on server link in the System Settings section>

http://www.mukalian.com/blog/image.axd?picture=2010%2f11%2fOfficeWebApps12.png 

14. You'll note in the Services page that there are now instances of the services that represent the ones necessary for Office Web Applications.  These will need to be started up.  Click Start on each one to start them up.
      - Note: When installing Office Web Apps in a multi-server environment, these will need to be started on each server that you choose to run them on.>


http://www.mukalian.com/blog/image.axd?picture=2010%2f11%2fOfficeWebApps13.png 

15. Now that the instances are started up, we'll need to create the service spplications, and their proxies, thereby wiring up the Web front-ends to the service applications.  So from the home page of Central Administration click the Manage service applications link in the Application Management section>

http://www.mukalian.com/blog/image.axd?picture=2010%2f11%2fOfficeWebApps14.png 

16. In the Service Applications page, when you click the <New> button, you'll see a list of Service Applications types to create.  Note that you now see the ones relevant to Office Web Apps.  These are the ones we now have to create.  So, from this dropdown, click the Word Viewing Service option.  The Word Viewing Service Application dialog appears.
 

http://www.mukalian.com/blog/image.axd?picture=2010%2f11%2fOfficeWebApps15.png 

17. In the Word Viewing Service Application dialog you should enter:
      - The Name of the service application
      - Determine if you wish to use an existing application pool, or create a new one.  In this instance, use the existing Default application pool
      - Make sure the checkbox is checked to add this service application's proxy to the farm's default proxy list
      - Click <OK> when complete


http://www.mukalian.com/blog/image.axd?picture=2010%2f11%2fOfficeWebApps16.png 

18. Now that you've created the service application for the Word Viewing Service, you'll need to create one for the PowerPoint Service Application.

http://www.mukalian.com/blog/image.axd?picture=2010%2f11%2fOfficeWebApps17.png 

19. Now, depending on how you originally installed SharePoint 2010, you may or may not have to create a service application for the Excel Services Application.  If you installed via the wizard-based GUI, this will already have been created.  If you used a scripted install (say, via PowerShell), you may not have created one for Excel.  So, if one doesn't yet exist for Excel Services, create one.
20. Once all the service applications have been created, you'll need to activate the Office Web App features on the site collection you want to access them from.  Note that this is a site collection-scoped feature, so, go to your site collection's top-level site, and from its Site Settings page, click the Site collection features link in the Site Collection Administration section

http://www.mukalian.com/blog/image.axd?picture=2010%2f11%2fOfficeWebApps18.png

21. Here, you want to activate the Office Web Apps feature first


http://www.mukalian.com/blog/image.axd?picture=2010%2f11%2fOfficeWebApps19.png

 22. And then activate the Open Documents in Client Applications by Default feature

http://www.mukalian.com/blog/image.axd?picture=2010%2f11%2fOfficeWebApps21.png
23. Now, when you mouse-over an Office Word document, PowerPoint deck, or Excel Spreadsheet you'll see the following options in the dropdown menu

http://www.mukalian.com/blog/image.axd?picture=2010%2f12%2fOfficeWebApps22.png

Now, you're able to view and edit Office content within the browser.  Click the images below for examples of the in-browser Excel, PowerPoint, and Word features.
Excel

http://www.mukalian.com/blog/image.axd?picture=2010%2f12%2fOfficeWebApps23.png

PowerPoint

http://www.mukalian.com/blog/image.axd?picture=2010%2f12%2fOfficeWebApps24.png

Word

http://www.mukalian.com/blog/image.axd?picture=2010%2f12%2fOfficeWebApps25.png

Additional Items to Consider
While you can go through the UI to perform the activation of the features on a site collection, when you have multiple site collections going through the UI is not only tedious, but a bit time consuming.  You can create a PowerShell script and use the Enable-SPFeature to activate features via script.  So you could loop through all the site collections in a web application and enable them that way.
Also, when creating the necessary service applications, you can also create specific application pools (along with designated managed accounts) to run these service applications.  Keep in mind that whatever new accounts you use (if not using the default) that they need to have read/write access to the SPConfig and all content databases that house the site collections where Office Web Apps was activated.


Reference:

http://www.mukalian.com/blog/post/2010/12/11/Installing-Office-Web-Apps-Existing-SharePoint-2010-Server-Farm.aspx

SharePoint 2010: Connecting to WCF service as External Content Type


Excellent Article by Mahesh explained step by step

Abstract: By using WCF Service with Business Data Connectivity, a SharePoint 2010 portal can easily connect to any external system within the organization or even to an external software system outside the organization. In this article, we will see how to connect between a WCF service and Sharepoint 2010
When you develop a SharePoint 2010 portal for an Organization, your portal may need to connect to an external software system for e.g. an already available accounting software system. To establish such communications in SharePoint 2010, we can use the Business Data Connectivity Web Service. This service helps to establish communication between the SharePoint 2010 portal and an external data source like SQL Server, WCF and other .NET types.
In this article, I am going to explain how to establish connection between SharePoint 2010 portal and WCF service. To consume WCF service, I have used SharePoint Designer 2010.
Note: To learn how to establish connection between SP2010 and SQL Server, read my previous article
For this article, I already have created a Web Site ‘http://MyServer/sites/ss’.
Step 1: Open VS2010 and create a new WCF Service Application, rename ‘IService1.cs’ to ‘IService.cs’ and ‘Service1.cs’ to ‘Service1.cs’. Open ‘IService.cs’ and add the following method and class in it:
iservice
Step 2 : Open Service.cs and implement the ‘IService’ interface in Service class:
iservice-implementation
Step 3: Open Service.svc in markup by right-clicking on it and change the Service attribute as shown below:
<%@ ServiceHost Language="C#" Debug="true" Service="WCF_For_SPS.Service" CodeBehind="Service.svc.cs" %>
Step 4: Publish the Service on IIS (IIS 7.0). The communication will happen in the following manner:
sp2010-wcf
 

Communication from Website to WCF

Now to communicate from the Web Site to WCF, follow these steps
Step 1: Navigate to the ‘http://MyServer/sites/ss’ web site. Click on ‘Site Actions’ on the top left, and select ‘Edit in SharePoint Designer’ as below:
edit-sharepoint-designer
Step 2: The SharePoint 2010 Designer will open with the Site. Click on the ‘External Content Type’ from the left pane as shown below:
external-content-type
This action will open the ‘External Content Types’ window.
Step 3: Click on the ‘External Content Type’ on the top left. This will open the ‘New External Content Type’ window as shown below:
new-content-type
Set the Name of the External Content Type as shown below, the Office Item Type is set to ‘Generic List’
office-item-type
Click on ‘Click here to discover external data sources and define operations’ and you will get the ‘Add Connection’ as shown below:
add-connection
Click on ‘Add Connection’. You will see the ‘External Data Source Type Selection’ window. Select WCF from it as shown below:
select-wcf-service
A ‘WCF Connection’ window appear where you can enter the WCF Service Metadata URL and Service EndPoint URL as shown below:
Note: Instead of the localhost please specify IP address or name of the server.
wcf-connection
The WCF Service will be added in the SharePoint 2010 Designer as shown below:
data-source-explorer
Step 4: Now once the WCF Service is configured with the Site, we need to define Operations for the List generated. Right Click on the ‘GetEmployees’ method and select ‘New Read List Operation’:
new-read-list
This will start the ‘Read List Wizard’ as shown below:
read-list-wizard
Click on ‘Next’ and you will get the ‘Input Parameters Configuration’ window. Since there is no input parameter for the method, you can simply click on ‘Next’. You will get the ‘Return Parameter Configuration’ screen. Since the method returns an Employee List, we need to set an identifier as shown below:
return-parameter
Click on ‘Finish’. You will get the ‘GetEmployee’ operation List.
Step 5: Right Click on ‘GetEmployeeByEmpNo’ and select ‘New Read Item Operation’ as shown below:
new-read-item-operation
 
This will bring up the ‘Read Item‘ Wizard window
read-item-wizard
Click on ‘Next’ and you will see the ‘Input Parameters Configuration’ window, for this method the input parameter is ‘EmpNo’, we need to map it with Identifier as below:
input-parameter-config
Click on ‘Next’ again. Since the return parameter for this method is an ‘Employee’ object, we need to set ‘EmpNo’ as map to the Identifier as shown below:
map-to-identifier
Click on ‘Finish’ and you will get the ‘GetEmployeeByEmpNo’.
Step 6: Let’s move to add Insert operation. To do this, right –click on ‘InsertEmployee’ method and select ‘Create New Operation’ as below:
new-create-operation
This will start the ‘Create’ Wizard as shown below:
create-wizard
Click on ‘Next’ to see the ‘Input Parameters Configuration’ window. Once again, since the input parameter for this method is the Employee object, we need to set ‘EmpNo’ as Map to the Identifier as shown below:
input-param-config
Click on ‘Next’.  Since there is no output parameter for this method, you can simply click on Finish. You should get all the operations listed as shown below:
external-operatios
 
Save the configuration by clicking ‘Save’ button on the top left of the SharePoint 2010 Designer.
Step 7: Now to create a List, click on the ‘Create List & Form’ on the Ribbon of the SharePoint 2010 designer as shown below:
create-list-form
In the ‘Create List and Form for EmployeeWCFServiceList’ window, enter the List Name as shown below:
create-list-form-2
This creates a List on the Web Site.
Step 8: Open the Web Site and you will find the ‘EmployeeEWCFListData’ list created in the Quick Launch bar
quick-launch
Step 9: Click on the List and you will see the following result
employee-wcf-listdata
You must be wondering why do you get the ‘Access denied by business data connectivity’ error? The reason can be understood by this simple architecture diagram shown below:
sharepoint-bcs-architecture
Since the user has to be impersonated by the WCF Service, we need to set the access rights for the user.
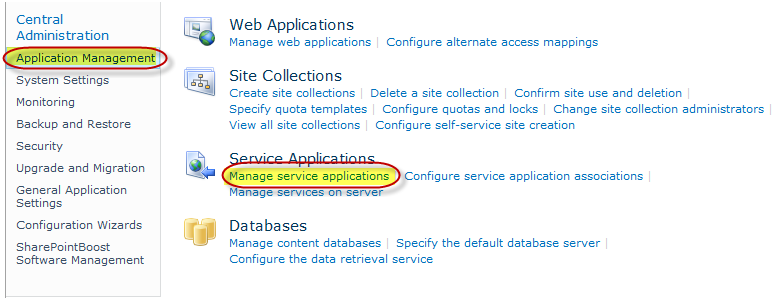
Step 10: To set the Access rights, Open SharePoint Central Administration > ‘Application Management’ > select ‘Service Applications’ and click on ‘Manage Service Applications’. You will see the ‘Business Data Connectivity Service’. Click on it and you will get the External Lists as shown below:
service-app-info
Select ‘EmployeeWCFServiceList’ and click on the ‘Set Object Permissions’ on the Ribbon. The ‘Set Object Permissions’ window appears. Add the user in it as shown below:
set-object-permissions
Step 11: Refresh the Web Site. The result will be as shown below:
list-data
Step 12: Select a Record on the List and click on ‘View Item’ as shown below:
view-item
employee-data-list-item
Step 13: To insert a record, click on ‘List Tools’ on the Ribbon and select ‘Items’ from it. Then click on ‘New Item’ as shown below:
list-data-new-item
Step 14: The New Item Window appears. Enter the record info in it as shown below:
add-record
Click on ‘Save’ and the newly added record appears in the List
newly-added-record
Like wise, you can implement the Update and Delete methods also.
Conclusion
With the External Content Types feature provided in SharePoint 2010, communication between two systems can be achieved easily. By using WCF Service with Business Data Connectivity, a SharePoint 2010 portal can easily connect to any external system within the organization or even to an external software system outside the organization.
The entire source code of this article can be downloaded over here
Reference:

http://www.dotnetcurry.com/showarticle.aspx?ID=799