Showing posts with label Powershell. Show all posts

Sunday, 23 November 2014

How to schedule User Profile Incremental Synchronization in SharePoint 2010 using Power shell


In this article we will be seeing how to schedule User Profile Incremental Synchronization in SharePoint 2010 using Power shell.

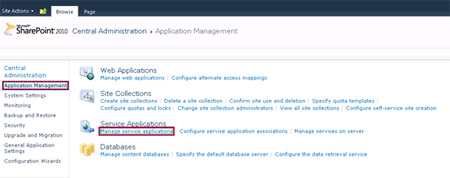
In SharePoint 2010 User Profile Service Application once you have configured the synchronization connections, you can schedule the User Profile Incremental Synchronization by going to Application Management => Manage services applications => User Profile Service => Synchronization => Configure Synchronization Timer Job.

1.gif

The same thing can be done using powershell commands.

Get-SPTimerJob is used to return timer jobs.

Get-SPTimerJob returns all the timer jobs with Name, Schedule and Last Run.

2.gif


The following one is used to display the Name and the Display Name.

3.gif

The following one is used to display the timer job status of a particular service application.

4.gif

UserProfile_ProfileImportJob => is the timer job for User Profile Incremental Synchronization.


Scheduling the User Profile Incremental Synchronization:

Get-SPTimerJob UserProfile_ProfileImportJob | Set-SPTimerJob -Schedule "weekly at sat 7:00" | Start-SPTimerJob

Schedule:

Specifies the schedule for running the timer job.

The type must be a valid SharePoint Timer service (SPTimer) schedule in the form of any one of the following schedules:

  • Every 5 minutes between 0 and 59
  • Hourly between 0 and 59
  • Daily at 15:00:00
  • Weekly between Fri 22:00:00 and Sun 06:00:00
  • Monthly at 15 15:00:00
  • Yearly at Jan 1 15:00:00


Reference:

http://www.c-sharpcorner.com/uploadfile/anavijai/how-to-schedule-user-profile-incremental-synchronization-in-sharepoint-2010-using-power-shell/


Adding and Deploying Solutions with PowerShell in SharePoint 2010


Visual Studio 2010 makes it really easy to add and deploy solutions when you are developing, but you may eventually want to deploy those solution packages elsewhere right?  We can still use stsadm, but that is effectively considered deprecated now in favor of PowerShell.  In the past to add a solution, we used an stsadm command like the one below.  In today’s example, we’ll be working with a package called SharePointProject2.wsp on my server named sp2010.

stsadm –o addsolution –name SharePointProject2.wsp

To get started with PowerShell, run the SharePoint 2010 Management Console located in your Microsoft SharePoint 2010 Products folder on your start menu.  This automatically loads the Microsoft.SharePoint.PowerShell snappin so that we can execute SharePoint commands.  To install a solution we use the Add-SPSolution command.  If you are using a Sandboxed solution you would use Add-SPUserSolution instead.  It takes just one parameter, –literalpath, which is the path to the solution file.  One thing that is different is that you must specify the full path to the file for some reason.  I haven’t been able to get it to take a path to the solution in the current folder even if I make use of .\ before the filename.  Here is an example.

Add-SPSolution c:\code\SharePointProject2\bin\debug\SharePointProject2.wsp

In this case you don’t actually have to type –literalpath before the parameter.  This is what it looks like when executed.  You can see that it displays the id of the solution along with its deployment status.

http://www.dotnetmafia.com/blogs/dotnettipoftheday/PowerShellAddSolution_4B900194.png


Now we need to deploy the solution.  In the past, we used an stsadm command like the following.

stsadm –o deploysolution –name SharePointProject2.wsp –url http://moss-server –allowCasPolicies –immediate

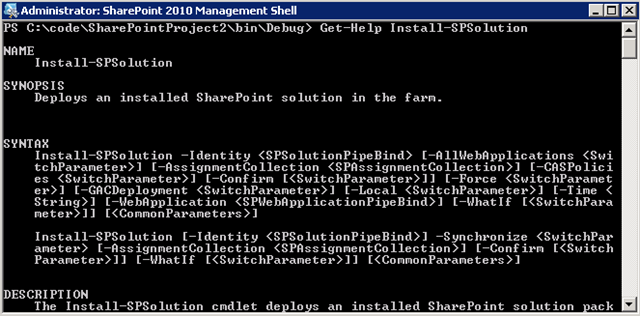
We would also follow this up with a call to stsadm with the execadmsvcjobs operation.  To do the same operation in PowerShell, we use the Install-SPSolution command (again use Install-SPUserSolution for Sandboxed solutions).  You can use the Get-Help command (i.e.: Get-Help Install-SPSolution) to get more information on a command but it’s not always obvious what it is expecting as you can see below.  That is why I am writing the post today.
 http://www.dotnetmafia.com/blogs/dotnettipoftheday/PowerShellGetHelpInstallSolution_300AFF91.png

The first parameter you need is the –Identity parameter.  This is the name of the solution package (i.e.: MySolution.wsp).  Depending on if you are using the GAC or Code Access Security, you will specify either –GACDeployment or –CASPolicies.  You then need to specify a specific web application using the –WebApplication parameter or –AllWebApplications to deploy it to all web applications (assuming the manifest allows it).  If you need to force the deployment, you can still use the –Force command.  Here is what an install command might look like.

Install-SPSolution –Identity SharePointProject2.wsp –WebApplication http://sp2010 -GACDeployment

I’ll point out that executing this command actually does do the deployment operation.  You don’t have to fire off something to execute a job later like you did with stsadm.
You might want to update your solution, so we’ll talk about how to do that as well.  Here is what your stsadm command might have looked like in WSS3.  Which would also be followed up with an execadmsvcjobs operation.

stsadm –o upgradesolution –name SharePointProject2.wsp –filename SharePointProject2.wsp –immediate –allowCasPolicies

The upgrade solution syntax is similar to the others.  We just have to specify an identity and a literalpath with the Update-SPSolution command.  The identity is the name of the package on the server to upgrade and the literalpath is the full path to the new solution package on the file system.  Here is what that might look like.

Update-SPSolution –Identity SharePointProject2.wsp –LiteralPath c:\code\SharePointProject2\bin\debug\SharePointProject2.wspGACDeployment

We’ve talked about everything else, so we’ll finish it up by talking about retraction and removal.  To retract a solution we use the Uninstall-SPSolution command.  By now you are probably noticing a pattern in the way things are named.  Install –> Deploys, Uninstall –> Retracts.  It also just uses the -Identity parameter and the –WebApplication parameter.  You can also use the –AllWebApplications parameter to retract it from all web applications. Many of these commands may prompt you with an “Are you sure?” type prompt.  You can skip this prompt by adding a –confirm parameter.  Here is what it looks like.

Uninstall-SPSolution –Identity SharePointProject2.wsp –WebApplication http://sp2010

Lastly, to remove the package from the solution store, we use the Remove-SPSolution command.  It just takes the name of the package.

Remove-SPSolution –Identity SharePointProject2.wsp

I hope this helps.  If you’re like me, it’s one thing to see the docs on something, but I like to see real examples.  There aren’t any examples in the Get-Help command yet.  This should cover all of the common commands that you probably used to used with stsadm in regards to solution deployment.  The nice thing is that you can script these things together very easily and create highly flexible PowerShell scripts.  Expect a few more posts soon on the basics of working with PowerShell and SharePoint 2010.
To learn more about using PowerShell with features, see Activating and Deactivating Features with PowerShell


Reference:

http://www.dotnetmafia.com/blogs/dotnettipoftheday/archive/2009/12/02/adding-and-deploying-solutions-with-powershell-in-sharepoint-2010.aspx

Wednesday, 19 November 2014

Create Content Sources in SharePoint 2010 using PowerShell


In this article we will be seeing how to create Content Sources for Enterprise Search Service Application in SharePoint 2010 using PowerShell.

Automating the Content Source creation in SharePoint 2010

A content source is used to specify what type of content is crawled, what URLs to crawl, how and when to crawl.

We can create Content Sources for Enterprise Search Service Application in SharePoint 2010 from Central Administration.

Go to Central Administration => Application Management => Manage Service Applications => Enterprise Search Service Application.

Create Content Sources in SharePoint 2010 using PowerShell

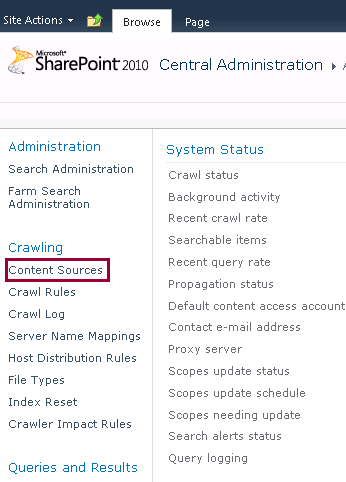
On the Quick Launch Menu, go to Crawling and then click on Content Sources.

Create Content Sources in SharePoint 2010 using PowerShell

You could be able to see the Content Sources. By clicking on New Content Source link we can create a new Content Source.

Another way is we can create the content sources for Search Service Application using SharePoint Object Model.

Here we will be seeing about automating the content source creation using powershell script.

Steps Involved:

  1. Create the input XML file which contains the inputs for content source creation.
  2. Create ps1 file which contains the script for content source creation.
CreateContentSources.xml

<?xml version="1.0" encoding="utf-8" ?>
<ContentSources>
  <
SSAName>EnterPrise Search Service Application</SSAName>
  <ContentSource Name="Sample1 SharePoint Sites" />
  <ContentSource Name="Sample2 SharePoint Sites" />
  <ContentSource Name="Sample3 SharePoint Sites" />
</ContentSources>

CreateContentSources.ps1

 #----------------Get the xml file---------------------------------------------------------------
 [xml]$xmlData=Get-Content "C:\Users\Desktop\ContentSources\CreateContentSources.xml"
 #----------------Create New Content Source function---------------------------------------------
 function CreateNewContentSource
 {
       
$flag=0
       
$ssa=Get-SPEnterPriseSearchServiceApplication -Identity $xmlData.SSAName
       
$ssaContent = new-object Microsoft.Office.Server.Search.Administration.Content($ssa)
       
$xmlData.ContentSources.ContentSource | ForEach-Object {
             
$contentSourceName=$_.Name
             
foreach ($availableContentSource in $ssaContent.ContentSources)
             {
                 
if ($availablecontentSource.Name.ToString() -eq $contentSourceName)
                  {
                         
write-host -f Yellow $contentSourceName "content source already exists"
                    
write-host -f Yellow Deleting $contentSourceName content source                   
                    
$availablecontentSource.Delete()
                    
write-host -f Green $contentSourceName content source is deleted successfully
                     write-host -f yellow Creating $contentSourceName 
                    
$ssaContent.ContentSources.Create([Microsoft.Office.Server.Search.Administration.SharePointContentSource], $contentSourceName)
                    
write-host -f green $contentSourceName  "content source is added successfully"
                     $Flag=1
                    
break
                  }
             }
             
if($Flag -eq 0)
             {
                   
write-host -f yellow Creating $contentSourceName 
                   
$ssaContent.ContentSources.Create([Microsoft.Office.Server.Search.Administration.SharePointContentSource], $contentSourceName)
                   
write-host -f green $contentSourceName  "content source is added successfully"
             }
       }
 }
 #----------------Calling the function---------------------------------------------
CreateNewContentSource


Run the Script:

  1. Go to Start.
  2. Click on All Programs.
  3. Click on Microsoft SharePoint 2010 Products and then click on SharePoint 2010 Management Shell.
  4. Run the C:\Users\Desktop\ContentSources\CreateContentSources.ps1
Output:

Create Content Sources in SharePoint 2010 using PowerShell

And in the Central Administration you could see the newly added content sources as shown in the following

Create Content Sources in SharePoint 2010 using PowerShell


Reference:

http://www.c-sharpcorner.com/uploadfile/anavijai/create-content-sources-in-sharepoint-2010-using-powershell/

Object Disposal in Power Shell scripting for SharePoint 2010


In this article I am trying to explain object disposal in Power Shell. Most of us are aware of object disposal in SharePoint object model. In scenarios in which we use SharePoint objects extensively-for example, in SharePoint sites that use custom Web Parts or event handler etc.it can cause the following unusual behaviors if we are not disposing of SharePoint objects once we finished with the operation. The following are the main causes if you don't dispose SharePoint objects properly in custom coding.
  • Frequent recycles of the Windows SharePoint Services application pool, especially during peak usage
  • Application crashes that appear as heap corruption in the debugger
  • High memory use for Microsoft Internet Information Services (IIS) worker processes
  • Poor system and application performance
Similarly in Power shell scripting also we have to adopt disposal practices to avoid memory leakage resulting in performance issues on your servers.

We have two methods for disposal practice

  1. Explicitly dispose every object you create
  2. Use SpAssignmentGlo
Explicitly dispose every object you create

Please find one example for explicit dispose

$template = Get-SPWebTemplate "STS#0"
New-SPSite -Url "your Site collection URL" -OwnerAlias "domain\user" -Template $template
$template.dispose()

SpAssignment

Any objects defined between the Start-SPAssignment –Global and Stop-SPAssignment –Global commands will be automatically disposed of by PowerShell.You don't have to explicitly dispose each object you created

Start-SPAssignment –Global

$template = Get-SPWebTemplate "STS#0"
New-SPSite -Url "your Site collection URL" -OwnerAlias "domain\user" -Template $template

Stop-SPAssignment –Global


Reference:

http://www.c-sharpcorner.com/uploadfile/Roji.Joy/object-disposal-in-power-shell-scripting-for-sharepoint-2010/

Get all the Managed accounts in SharePoint 2010 using Powershell


In this article we will seeing how to get all the managed accounts using powershell in SharePoint 2010.

Managed Accounts:

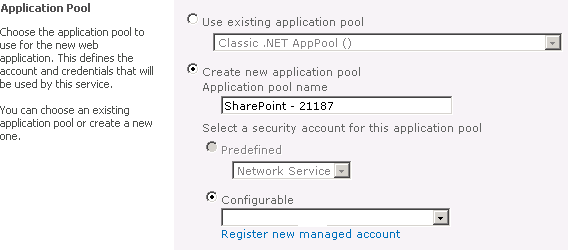
Managed Accounts is a new feature in SharePoint 2010. Managed accounts are Active Directory user accounts whose credentials are managed by and contained within SharePoint. When administrators configure a new web application or service application they don't have to remember the username and passwords every time if the service account is registered. They can just simply select the managed account and they can configure the web application and service application. For example when administrator create a new web application (Go to Central Administration => Application management => Manage Web Applications => Click New in the ribbon interface)

Administrator can just choose the service account (whose account is already is registered) for the application pool from the drop down as shown in the following

RegisShare1.gif


Automatic password change:

SharePoint 2010 also introduces automatic password change.

Automatic password change enables SharePoint to automatically generate new strong passwords on a schedule you set. Select the Enable automatic password change checkbox to allow SharePoint to manage the password for the selected account.

If an account policy based expiry date is detected for the account, and the expiry will occur before the scheduled date and time, the password will be changed on a configured number of days before the expiry date at the regularly scheduled time.

We can choose to enable e-mail notifications in order to have the system generate warning notifications about upcoming password change events.

We can also specify a time and schedule for the system to automatically change the password.

Get all Managed Accounts:

Go to Central Administration => Security => General Security => Configure managed accounts.

RegisShare1.gif

You could be able to see all the managed accounts.

The same thing can be achieved using the following powershell cmdlet.

Get-SPManagedAccount:

Get-SPManagedAccount – Retrieves accounts registered in the configuration database.

Go to Start => All Programs => Microsoft SharePoint 2010 Products =>SharePoint 2010 Management Shell => Run as administrator.

Type the following command

Get-SPManagedAccount

This command displays all the managed accounts in the farm.

Note: For more information on Get-SPManagedAccount cmdlet refer http://technet.microsoft.com/en-us/library/ff607835.aspx


Reference:

http://www.c-sharpcorner.com/uploadfile/anavijai/get-all-the-managed-accounts-in-sharepoint-2010-using-powershell/

How to Create a Site Collection using Power Shell in SharePoint 2010

In this article I am showing you how to perform Import/Export operation of a particular SharePoint site using Power Shell

1. On the Start menu, click All Programs.

2. Click Microsoft SharePoint 2010 Products.
3. Click SharePoint 2010 Management Shell.
4. At the Windows Power Shell command prompt type the following command:

1.gif

5. You will get a Power shell command prompt like below

2.gif

6. In SharePoint 2010, Power Shell command Get-SPWebTemplate is used to export the site

7. Please see the screen shot for the Power Shell command

$template = Get-SPWebTemplate "STS#0"
New-SPSite -Url "your Site collection URL" -OwnerAlias "domain\user" -Template $template

3.gif

8. Where STS#0" represent a team site template

9. Please make sure you have created a managed path for the same. I will cover creating managed path in another article

10. You can use the below command to display basic information about all the STS templates

Get-SPWebTemplate "STS*"

4.gif


Reference:

http://www.c-sharpcorner.com/uploadfile/Roji.Joy/how-to-create-a-site-collection-using-power-shell-in-sharepoint-2010/

Configure SSL certificate warning settings using Power Shell

In this article I am showing you how to perform backup/restore operation using Power Shell

1. On the Start menu, click All Programs.

2. Click Microsoft SharePoint 2010 Products.
3. Click SharePoint 2010 Management Shell.
4. At the Windows Power Shell command prompt type the following command:
Image1.gif

5. You will get a Power shell command prompt like below

Image2.gif

6. In SharePoint 2010, Power Shell command Backup-SPSite is used for taking backup

7. Please see the screen shot for the backup Power Shell command

8. Backup-SPSite -Identity http://ServerName:port -Path "c:\backup\file.bak"

 Image3.gif

9. If you want to overwrite a previously used backup file, use the Force parameter. You can use the NoSiteLock parameter to keep the read-only lock from being set on the site collection while it is being backed up. However, using this parameter can allow users to change the site collection while it is being backed up and might lead to possible data corruption during backup.

10. Once this done you will get the backup.

11. Next you have to create site collection then use the below command to restore the backup that we currently taken.

12. Restore-SPSite -Identity http://Servername:port -Path "c:\backup\file.bak" -force

Image4.gif

13. I am using force command because I want to overwrite the existing site collection that I created now.


Refernce:

http://www.c-sharpcorner.com/uploadfile/Roji.Joy/backuprestore-of-sharepoint-2010-site-collection-using-power-shell/