Tuesday, 2 December 2014

SharePoint Interview Questions and Answers: EventRecievers


Nice post by  sasikumarreddy valipireddy on Event Recievers in Sharepoint


  1. Event Receivers and types of event receivers?
  2. Best coding practice on event receivers?
  3. Use of DisableEventFiring() and EnableEventFiring()?
  4. BeforePropeties and AfterProperties?
  5. What all are Event receivers features introduced in SharePoint 2010?
  6. What are all new Event Receivers introduced in SharePoint 2010?
  7. Difference between event receivers and workflows?
  8. How to add an event receiver to the specific list programmatically?
  9. How to add an event receiver to the specific content type programmatically?
  10. How to add an event receiver to the content type using feature.xml file?
  11. The ItemUpdating event or the ItemUpdated event occurs two times when you enable the Require Check Out option for a document library in Windows SharePoint Services 3.0?
  12. Event Receivers with custom error page?
  13. I have one requirement, i.e. is there is one list name “Student Marks” and fields has English, Hindi, Telugu, Total, AVG. Total=English+Hindi+Telugu. The total field should be update automatically if I update any of the language marks. But here the actual problem is if you are updating two fields at a time the ItemUpdating event fires 2times. But I don’t want to fire twice. How?
  14. I have one document library and I want to allow only specific extension files (like .doc, .pdf etc.) into that document library? How can I prevent it?
  15. Why can't we use spcontext in event receivers? 
  16. Error occurred in deployment step 'Recycle IIS Application Pool': The vssphost4.exe process was unable to start due to an unknown error?  
  17.  How to delete the event receivers?
  18. How to check whether the event receiver attached or not? 
  19. I have one custom developed master page. I want to set this master page dynamically for newly created sites. what is the approach to do that?
  20. How can we handle not to allow duplicate documents in a document library?
Event Receivers:
Event Receivers has taken places either synchronously or asynchronously. If the action has taken before code execution.

All receivers that end with “ing” are synchronous and those which end with “ed” are asynchronous.

Synchronous Event Handlers will work before the event is completed while asynchronous event handlers will fire after the event is completed. 
Synchronous events
·         Occur before the event.
·         Block the flow of code execution until your event handler completes.
·         Provide you with the ability to cancel the events resulting in no after event (“…ed”) being fired.
Asynchronous events:
·         Occur after the event.
·         Do not block the flow of code execution in SharePoint
Note:-Event Handlers should be placed in GAC only.
New Features in SharePoint 2010:
  1. Another great improvement to event handlers in SharePoint 2010 is with the improvements to Visual Studio 2010, and what it takes to create them. Notice, when you add a new item into a Visual Studio project, three is an Event Receiver template you can choose from:
  2. Now can register an event to the site level or web level. In the feature xml file we have to use the “Scope” attribute to either “Web” [Web site] or “Site” [Site collection]. The default value will be site level. This is one of main feature introduced in SharePoint 2010.
  3. Another important one is the ListUrl attribute, which allows you to scope your receiver to a particular list by passing in the relative URL.
  4. Note: ListUrl works only if feature has Scope=”Web”. In case the feature has Scope=”Site”, event receiver is fired for every list and library, ListUrl is ignored.
  5. In SharePoint 2007, error messages are not user friendly in event receivers. Now in SharePoint 2010, can provide user friendly error messages by redirecting to our own custom application pages.
  6. By using below properties, we can do it:
properties.Status = SPEventReceiverStatus.CancelWithRedirectUrl;
properties.RedirectUrl = "/_layouts/EventReceiverProject1/CustomErrorPage.aspx?Error=" + errorMessage;
New Event Receivers on SharePoint 2010:
On List:
    ListAdding(SPListEventProperties): This will be fired when a new list is getting created.
    ListAdded(SPListEventProperties): This will be fired after a list is created in database.
    ListDeleting(SPListEventProperties): This will be fired when a list is deleting.
    ListDeleted(SPListEventProperties): This will be fired after a list is deleted from database.
On Web:
    WebAdding(SPWebEventProperties): This will be fired before a new site is getting created.
    WebProvisioned(SPWebEventProperties): This will be fired after web site is successfully created and provision processed successfully. This will work either in synchronous mode or asynchronous mode.
Note: A site is being provisioned and A site was provisioned-->Notice that now you are no longer depending on "feature stapling" to execute code on a site after it is provisioned. You can now just attach this web event. This is new concept introduced in SharePoint 2010.
DisableEventFiring() and EnableEventFiring():
One reason to prevent events from being raised is to avoid recursion. For example, if you have an ItemAdded event on a list and you write code within it to add an item, you can put that code in a DisableEventReceivers() ... EnableEventReceivers() block to avoid recursion.
When you add a new item, only the ItemAdding() event is raised. However, in cases where Explorer View is used, both the ItemAdding() and ItemUpdating events are raised. In such cases the ItemUpdating event always occurs after the ItemAdding() event occurs.
Difference between event receivers and workflows?
  1. Unlike Workflows, Event Receivers cannot be triggered manually. SharePoint event handlers run for a short period of time (generally seconds), while SharePoint workflows may run for a much longer time period (days, months, or even years).
  2. Workflows run asynchronously means we can trigger the workflows only when an item is created and when an item is modified but event receivers can work either synchronously and asynchronously.
  3. Workflows can start manually but Event Receivers cannot.
  4. Can cancel the operation in Workflows but in SharePoint 2010 we can cancel the event receivers also.
  5. We can create workflows either by using SharePoint designer or visual studio but we should create an event receivers using visual studio only.
  6. SharePoint event handlers are automatically initiated, while SharePoint workflows can be initiated either automatically or manually.
  7. There is no User Interface(UI) for the event receivers.
Reference:
Add an event receiver to the specific list programmatically?
Add an event receiver to the content type programmatically?
Add an event receiver to the content type using feature.xml file?
Best coding practice on event receivers?
The ItemUpdating event or the ItemUpdated event occurs two times when you enable the Require Check Out option for a document library in Windows SharePoint Services 3.0
How to Event Receivers with custom error page?
I have one requirement, i.e. is there is one list name “Student Marks” and fields has English, Hindi, Telugu, Total, AVG. Total=English+Hindi+Telugu. The total field should be update automatically if I update any of the language marks. But here the actual problem is if you are updating two fields at a time the ItemUpdating event fires 2times. But I don’t want to fire twice. How?
By using DiableEventFiring and EnableEventFiring methods we can prevent from event being raised 2 times. [Please refer on the above to get clear idea on those 2methods].

Why can't we use spcontext in event receivers?
We cannot use the SPContext.Current property into the event receivers, because the current context in event receivers is always equal to null. 
Avoid duplicate files into the document library in SharePoint 2010?

Use event receiver and checks at the ItemAdding level
http://social.technet.microsoft.com/Forums/en-US/sharepointdevelopment/thread/301f3a11-498a-4cf7-93f1-774a032606d0


Error Type: Error occurred in deployment step 'Recycle IIS Application Pool': The vssphost4.exe process was unable to start due to an unknown error.

The reason for cause of that issue is: Might be your opened solution debugging location is same as others opened solution debugging location. So, please close all the opened solutions and try again by opening your sol. That issue will not come this time. 
I have one document library and I want to allow only specific extension files (like .doc, .pdf etc.) into that document library? How can I prevent it?
You need to prevent it before adding files into the document library for that we need write code in ItemAdding() event.
public override void ItemAdding(SPItemEventProperties properties)
        {
            base.ItemAdding(properties);
            //if the list is equals to the PDF routing then only go inside...
            if (properties.ListTitle.Equals(ConfigurationManager.AppSettings["PDF_Library_Name"], StringComparison.InvariantCultureIgnoreCase))
            {
                string fileUrl = properties.AfterUrl;
                if (!string.IsNullOrEmpty(fileUrl))
                {
                    fileUrl = fileUrl.ToLowerInvariant();
                    string fileExtension = Path.GetExtension(fileUrl);
                    if (!string.IsNullOrEmpty(fileExtension) && !fileExtension.Equals(".PDF", StringComparison.InvariantCultureIgnoreCase))
                    {
                        properties.Cancel = true;
                        properties.ErrorMessage = "Only PDF files are allowed for PDF signature routing. Please try again.";
                    }
                }
            }
        }
Event Receiver remembers points:

Below are my best consideration points on Event Receivers and also shared enhancements in SharePoint 2010.
  1. By default event receivers are asynchronous meaning that they run under the SharePoint timer service (OWSTIMER.exe). This means that the event receivers:
  2. Another important property you may want to set for each event you attach is the Sequence Number. The sequence number determines the order your event assemblies’ fire. This is especially important when you have created multiple assemblies that are all attached to the same Site, List or Content Type event. 
  3. When you enable the Require Check Out option for a document library in Microsoft Windows SharePoint Services 3.0, the ItemUpdated event or the ItemUpdating event occurs two times. This occurs when the document library is updated. The same problem happens when you upload a document into a document library with a required column if this column is not filled in the document.
  4.         Sol: DisableEventFiring() and EnableEventFiring() [Explained about these 2months below clearly.]
  5. My test is that itemadding and itemadded will fire after you click OK on the first window (the one you choose the document to upload) and before the second window appears;
  6. Itemupdating and itemupdated will fire after you click Save on the second window (the one you fill out Meta data).
  7. The default synchronization behavior is synchronous for before events and asynchronous for after events.
  8. You can tell SharePoint to just have the receiver work on the root site by using the RootWebOnly attribute on the <Receivers> node.
  9. Do not instantiate SPWeb, SPSite, SPList, or SPListItem objects within an event receiver. Event receivers that instantiate SPSite, SPWeb, SPList, or SPListItem objects instead of using the instances passed via the event properties can cause the problems: Check below on best practices on working Event Receivers.
  10. Debugging a SPEmailEventReceiver requires attaching the debugger to the OWSTIMER.EXE process. This is because the timer service fires the Incoming E-mail timer job, rather than the SharePoint web application.
Please add comments if its really helped you. Thanks for reading.


Reference:

http://sharepointquicksolutions.blogspot.in/2012/07/event-receivers-interview-questions-and.html

Make Your SharePoint 2010 Master Page Extensible with Delegate Controls


I have been playing a lot the last little while with SharePoint 2010 Delegate Controls. I have known about them for a ling time, but have never really delved into them all that much.
Most of the examples I have looked at, and the usage ideas I have seen, involve using the existing delegate controls in V4.master to do things like:
  • Modify the Welcome Menu
  • Customize the Global Navigation
  • Add useful code to the page header
Last week, I used a delegate control for something a little different.
For a project I am working on, the client wanted some functionality displayed just below the Quick Launch, on every page in the site collection. I know there are lots of ways to do this (put a user control on the master page, put a web part on the master page, or just put links on the master page, since that’s all the content was in this case).
But then I thought of a little bit more elegant (to me) solution. Rather than explicitly putting the content on the master page, I added a delegate control of my own to the page, and placed it just below the Quick Launch, as shown below.

http://fyeomans.files.wordpress.com/2011/05/image6.png

Several things to note here:
  • I gave it a ControlID specific to my application;
  • I set AllowMultipleControls to true, which will be useful later
  • I included default content in the <Template_Controls> element, so that I could see it change when I activate a Feature with an appropriate control.
  • Next, I implemented a Feature in Visual Studio 2010, with a control to replace the default content. The details of how to do this are covered in other places (such as here), but to summarize:
  • I created an empty Visual Studio 2010 project;
  • I created a user control inside the project (this automatically mapped the ControlTemplates folder for me). It is a very simple user control, and simply displays “Hello, Delegate!”
  • I created an appropriate elements.xml file to map my control to the Delegate Control’s ControlID.
So, here we see the how the delegate looks before I deploy my feature:


http://fyeomans.files.wordpress.com/2011/05/image.png


After I deploy my Feature, we see that the default content is replaced with the Feature’s control’s output:

http://fyeomans.files.wordpress.com/2011/05/image1.png


But wait, there’s more! Remember that I set AllowMultipleControls to true? That allows me to deploy multiple features with controls that map to my ControlId, and instead of only displaying the one with the lowest Sequence attribute, it will stack them all in order of Sequence number, as shown below.


http://fyeomans.files.wordpress.com/2011/05/image2.png


This means that I can add any number of  things to the area under the Quick Launch without further customizing the the Master Page.
Maybe I am just easily amused, but I thought that was pretty neat!
The source for this, including the master page, is available here.


Reference:

http://fyeomans.com/2011/05/16/make-your-sharepoint-2010-master-page-extensible-with-delegate-controls/


Working with content placeholder controls


Master pages contain a set of controls that define replaceable content regions on a page. Each content placeholder control on the master page can be mapped to a respective content control on a content page. The content placeholder control on the master page determines the default content for the page, while the corresponding content control on a content page is used to specify unique content that overrides the default content from the master page.
This article provides an overview of content placeholder controls on a SharePoint 2010 master page and how you can locate them and modify them using SharePoint Designer 2010. Learn more about master pages in Introduction to SharePoint master pages.

In this article

What is a content placeholder control?
Default content placeholder controls on a master page
Viewing content placeholder controls on a master page
Working with content placeholder controls and content controls
Locate and modify a content placeholder control
Locate and modify a content control

What is a content placeholder control?

A content placeholder control is a piece of code on a master page that works together with a content control on a content page. The content placeholder control displays default content (which can be no content, if the control is empty) for that region on the page but can be overridden by unique content from a content control on a content page. Any page using the master page can replace the content in a content placeholder control by supplying a matching content control. If a content control is empty, the content placeholder control gets overridden with an empty value that consequently removes the control from the page. This is how master pages serve as a template for the many content pages on a SharePoint site.
The primary master page in SharePoint (v4.master is the default) contains a set of content placeholder controls used for different purposes, such as the site navigation, search area, site name and title, and the body of a page. When working with these controls, you can change their location or modify their appearance, including hiding them, but you should never delete one because they’re required to render content and functionality on a SharePoint site.
Top of Page

Default content placeholder controls on a master page

The primary master page (v4.master, by default) contains the following content placeholder controls, which are used to render content and functionality on a SharePoint 2010 site. This table includes the name of the content placeholder control and a description of each.
Content Placeholder
Description
PlaceHolderAdditionalPageHead
Used to add extra components such as JavaScript, Jscript, and Cascading Style Sheets in the head section of the page.
PlaceHolderBodyAreaClass
The class of the body area. This placeholder is no longer used in SharePoint 2010.
PlaceHolderBodyLeftBorder
This placeholder does not appear as part of the interface but must be present for backward compatibility.
PlaceHolderBodyRightMargin
This placeholder does not appear as part of the interface but must be present for backward compatibility.
PlaceHolderCalendarNavigator
The date picker used when a calendar is visible on the page.
PlaceHolderFormDigest
The container where the page form digest control is stored.
PlaceHolderGlobalNavigation
The global navigation breadcrumb control on the page.
PlaceHolderGlobalNavigationSiteMap
The list of sub-sites and sibling sites in the global navigation on the page.
PlaceHolderHorizontalNav
The navigation menu that is inside the top navigation bar.
PlaceHolderLeftActions
The additional objects above the Quick Launch bar.
PlaceHolderLeftNavBar
The Quick Launch navigation bar.
PlaceHolderLeftNavBarBorder
This placeholder does not appear as part of the interface but must be present for backward compatibility.
PlaceHolderLeftNavBarDataSource
The placement of the data source used to populate the left navigation bar.
PlaceHolderLeftNavBarTop
The top section of the left navigation bar.
PlaceHolderMain
The main content of the page.
PlaceHolderMiniConsole
This placeholder does not appear as part of the interface but must be present for backward compatibility.
PlaceHolderNavSpacer
This placeholder does not appear as part of the interface but must be present for backward compatibility.
PlaceHolderPageDescription
Description of the current page.
PlaceHolderPageImage
This placeholder does not appear as part of the interface but must be present for backward compatibility.
PlaceHolderPageTitle
The title of the site.
PlaceHolderPageTitleInTitleArea
The title of the page, which appears in the title area on the page.
PlaceHolderQuickLaunchTop
The top of the Quick Launch menu.
PlaceHolderQuickLaunchBottom
The bottom of the Quick Launch menu.
PlaceHolderSearchArea
The section of the page for the search box and controls.
PlaceHolderSiteName
The name of the site where the current page resides.
SPNavigation
Used for additional page editing controls.
PlaceHolderTitleAreaClass
The class for the title area. This control is now in the head tag and no longer used in SharePoint 2010.
PlaceHolderTitleAreaSeparator
This placeholder does not appear as part of the interface but must be present for backward compatibility.
PlaceHolderTitleBreadcrumb
The breadcrumb text for the breadcrumb control.
PlaceHolderTitleLeftBorder
This placeholder does not appear as part of the interface but must be present for backward compatibility.
PlaceHolderTitleRightMargin
This placeholder does not appear as part of the interface but must be present for backward compatibility.
PlaceHolderTopNavBar
The container used to hold the top navigation bar.
PlaceHolderUtilityContent
The additional content at the bottom of the page, outside the form tag.
Top of Page

Viewing content placeholder controls on a master page

When you open a SharePoint 2010 master page in SharePoint Designer 2010, you see the general layout of the site and the common elements that persist on each page, like the site name, navigation links, and search box. These elements are not coded directly on the page; instead, they’re provided by content placeholder controls. For example, the PlaceHolderLeftNavBar control is used for the Quick Launch menu; the PlaceHolderSiteName control is used for the name of the site; and the PlaceHolderMain control is used for the main body of the page. When a content page is requested by a browser, default content from the master page displays and unique content from the content page displays.
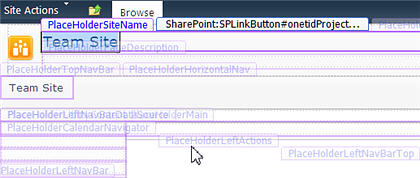
To see all the content placeholder controls on a master page, turn on the Template Region Labels visual aid, available on the View tab, Visual Aids menu. This highlights the content placeholder controls currently being used on the page like this.
Master page content placeholders
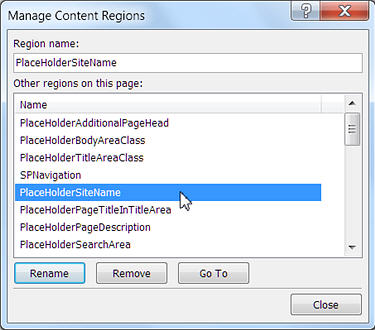
Another way to browse the available content placeholder controls on the master page is to use the Manage Content Regions feature, available on the Style tab. This feature provides a list of the content placeholder controls on the page. You can select one and click Go To to locate that particular content placeholder control on the page.
Master page content placeholders
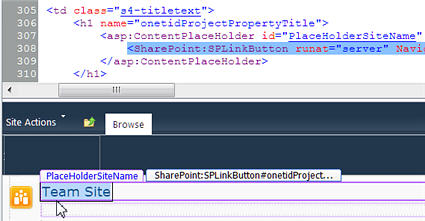
When working in Design view (the WYSIWYG editor in SharePoint Designer 2010), you can select a content placeholder control on the page and see the details of that content. For example, if you select the name of the site, you see the PlaceHolderSiteName control on the page, its tag position at the bottom of the screen, and the tags, styles, and other attributes applied to the control in the task pane.
If you’re working in Code view, you see the control inside the <asp:ContentPlaceHolder> tag. When you’re working in Split view, you see both references to the content placeholder control, as shown here.
SharePoint 2010 master pages
The PlaceHolderSiteName control, as an example, provides the site name on your pages. The default value comes from the master page, which inserts the title that was specified on the Site Settings > Title, Description, and Icon page in SharePoint 2010. If you wanted to change the site name on just one page, like the home page, you could open that page in SharePoint Designer 2010, locate the PlaceHolderSiteName control, and specify a unique name there (which creates the new content control on that page). This will override the content that would otherwise be provided by the master page.
With the master page open, you have access to all of the content placeholder controls used by your site. You can change their location, add or remove content surrounding the control, change the contents of the control, apply new tags or styles, and so on. If you’re working with an entirely new master page, you’ll be adding each content placeholder control to the appropriate location on the page. The new design and placement of content placeholders appears on every page that is attached to the master page.
Important    The content placeholder controls are required to render web pages in SharePoint 2010. Do not delete a content placeholder control, because doing so might break pages and sites associated with the master page. Instead, if you don’t want a content placeholder control to display, you can change its visible attribute to false or move the content placeholder to a hidden section on the page.
Top of Page

Working with content placeholder controls and content controls

To change the appearance of a content placeholder control on every page of your site, you should customize it on the master page. The changes will appear on every page that references the master page. To change the appearance of a content placeholder control on a single page, you should add or customize the content control on the individual page. This overrides the default value from the master page. The following steps explain how to locate the content placeholder controls or content controls on both pages. These steps are performed in SharePoint Designer 2010.

Locate and modify a content placeholder control

Follow these steps to locate the PlaceHolderSiteName content placeholder control on a SharePoint 2010 primary master page.
  1. Open your site in SharePoint Designer 2010 and in the navigation pane, click Master Pages.
    Note    If you don’t see Master Pages in the navigation pane, they may have been disabled in SharePoint. Contact your site administrator for details. Learn more in Managing SharePoint Designer 2010.
  2. In the master page gallery, click v4.master.
  3. On the master page summary page, click Edit file.
  4. If you are prompted to check out the file, click Yes.
  5. If you’re viewing the page in Design view, you can simply click an area on the page to see the content placeholder control that serves up that content.
  6. Alternatively, you can browse the available content placeholder controls by clicking the Style tab and in the Master Page group, click Manage Content Regions. Using this feature, you can quickly and easily locate the content placeholder controls on the master page.
  7. In the list of content regions, select PlaceHolderSiteName and then click Go To. Then click Close. The content placeholder control is selected on the page like this.
    SharePoint 2010 master pages
  8. From here, you might change its settings, change the location, apply different styles, and so forth. When finished, save the master page.
  9. If you’re warned that the changes will customize the page from its site definition, choose Yes.
    Note    SharePoint pages are, by default, associated with site definition files. When a master page is customized in SharePoint Designer 2010, it is no longer associated with the site definition. This can result in additional administrative work following future updates or upgrades to SharePoint, which is why you see this message. You can always reset the master page to its site definition, if necessary.
Your changes will appear on every page attached to this master page unless those pages were customized directly.
Top of Page

Locate and modify a content control

Follow these steps to locate the PlaceHolderSiteName content control on a SharePoint 2010 content page.
  1. Open your site in SharePoint Designer 2010 and then click Site Pages.
  2. Click the site page you want to modify, for example, Home.aspx.
  3. On the Page tab, in the Edit group, click Edit File and choose Edit File in Advanced Mode.
    Note    If the advanced editing mode isn’t available, it may have been disabled in SharePoint. Contact your site administrator for details. Learn more in Managing SharePoint Designer 2010.
  4. If you’re viewing the page in Design view, you can simply click an area on the page to see the content placeholder that serves up that content.
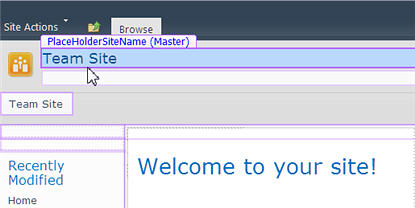
  5. For example, click the name of the site and you see PlaceHolderSiteName (Master) as shown below. The (Master) indicates the page is currently using the default content from the master page.
    Content placeholder on a content page
  6. There are a number of changes you could make here, like changing its appearance and location.
    You could also create a new content control on the page by clicking the arrow at the right edge of the control and choosing Create Custom Content. This changes the label to PlaceHolderSiteName (Custom), and you can start typing a new value for the control. This custom content overrides the default content from the master page.
    Note    To return to the content from the master page, click the arrow again, choose Default to Master’s Content, and then click Yes to remove the customized content.
  7. When finished, save the page.
  8. If you’re warned that the changes will customize the page from its site definition, choose Yes.
    Note    SharePoint pages are, by default, associated with site definition files. When a content page is customized in SharePoint Designer’s advanced mode, it is no longer associated with the site definition. This can result in additional administrative work following future updates or upgrades to SharePoint, which is why you see this message. You can always reset the content page to its site definition, if necessary.
Your changes will appear on just the content page that you customized and not the other content pages attached to the master page.

Reference:

https://support.office.com/en-in/article/Working-with-content-placeholder-controls-d8b87b85-d1ef-409d-a5c7-044890f89288?ui=en-US&rs=en-IN&ad=IN#__toc281325796

SharePoint CAML queries samples


CAML query is the way to get data from SharePoint lists. However, writing and debugging CAML queries is a headache, so I’ll post some samples of queries here. First to query SharePoint data programmatically you need to use SPQuery object like this

SPList myList = SPContext.Current.Web.Lists["My List"];
SPQuery query = new SPQuery();
query.ViewAttributes = "Scope=\"Recursive\""; // get data from all folders
query.Query = "<Where><Eq><FieldRef Name='Title'/><Value Type='Text'>MyItem</Value></Eq></Where>";
SPListItemCollection items = myList.GetItems(query);

1. Quering lookup field by lookupId

<Where>
    <Eq>
        <FieldRef Name='MyLookupField' LookupId='TRUE'/>
        <Value Type='Lookup'>22</Value>
    </Eq>
</Where>

2. Quering user field by user id
It’s quite the same as quering lookup field, because user field type is inherited from lookup type

<Where>
    <Eq>
        <FieldRef Name='CreatedBy' LookupId='TRUE'/>
        <Value Type='Lookup'>1</Value>
    </Eq>
</Where>

3. Quering user field by current user
Use <UserID> to get current user’s id

<Where>
    <Eq>
        <FieldRef Name='CreatedBy' LookupId='TRUE'/>
        <Value Type='Lookup'><UserID/></Value>
    </Eq>
</Where>

4. Quering datetime field
The trick here is that date should be in ISO 8601 format (YYYY-MM-DDTHH:MM:SSZ). You can use SPUtility.CreateISO8601DateTimeFromSystemDateTime function to convert date to proper string format.

<Where>
    <Geq>
        <FieldRef Name='Created'/>
        <Value Type='DateTime' IncludeTimeValue='True'>2011-05-01T00:10:00Z</Value>
    </Geq>
</Where>

5. Quering integer field
You can use this query to search items by ID (since ID field type is Interger)

<Where>
    <Geq>
        <FieldRef Name='ID'/>
        <Value Type='Integer'>10</Value>
    </Geq>
</Where>

6. Quering boolean field
The thing to remember is that boolean is integer field indeed, so query it as integer: 0 – false, 1 – true.

<Where>
    <Eq>
        <FieldRef Name='MyBoolField'/>
        <Value Type='Integer'>1</Value>
    </Eq>
</Where>

7. Composite queries
Problem with composite queries is that and tags can contains only 2 child nodes, so you need to constract you query attentionally, e.g. if you want to make query A & B & C, it should look like following:>

<And>
    <Eq>
        <FieldRef Name='CreatedBy' LookupId='TRUE'/>
        <Value Type='Lookup'><UserID/></Value>
    </Eq>
    <And>
        <Geq>
            <FieldRef Name='Created'/>
            <Value Type='DateTime'>2011-05-01T00:10:00Z</Value>
        </Geq>
        <Eq>
            <FieldRef Name='MyLookupField' LookupId='TRUE'/>
            <Value Type='Lookup'>22</Value>
        </Eq>
    </And>
</And>


Reference:

http://techno-sharepoint.blogspot.in/2012/10/sharepoint-caml-queries-samples.html

Difference between Load and LoadQuery in client object model


Load method populates the client object directly with what it gets data from the server i.e. a collection object like ListItemCollection etc. but LoadQuery returns the data as a completely new collection in IEnumerable format. Other major difference is that the Collections that you load using the Load() method are eligible for garbage collection only when the client context variable itself goes out of scope where as, in these collections go out of scope at the end of IEnumerable list.

                        You might have noticed that the Client Object Model has two load methods, Load() and LoadQuery(). The Load() method does an in-place loading of the data returned from the server. All of the data returned from the server is stored and tracked inside of the ClientContext object. The ClientContext tracks the object IDs of the items and properties returned from the server. For example if you call the server for the web object but do not return the title on the first call, you could subsequently call the server again for the title. The Title property is now filled in and ready to be used. This convenience does come with some trade-offs. For example, because the objects returned from the server are stored in the ClientContext object, it means that all of the data will only be garbage collected in the Silverlight application when the ClientContext object is cleaned out.


                     The LoadQuery() method returns the results as new objects. These objects are not part of the ClientContext and a result can be easily managed and discarded when not needed any more. Another difference between Load() and LoadQuery() is the type of queries you can write. The Client OM supports two types of queries: LINQ query syntax and method syntax. LINQ query syntax is a more natural declarative query language. This format is one that you are probably more familiar with and what people think of when they write LINQ queries. Listing 8.5 shows an example of a LINQ query to return visible Lists.

Reference:

http://techno-sharepoint.blogspot.in/2012/10/difference-between-load-and-loadquery.html

SharePoint 2010 - Introduction to Client Object Model


SharePoint 2010 provides a new client object model that enables you to create SharePoint solutions that run remotely from the SharePoint server farm. For example, the client object model enables you to consume and manipulate SharePoint data in Windows Forms applications, Windows Presentation Framework application, console applications, Silverlight applications, and ASP.NET Web applications.
 
For working with client object model you need to get two master dlls:
 
·         Microsoft.SharePoint.Client.dll
·         Microsoft.SharePoint.Client.Runtime.dll
 
These dlls you can find under following path from machine on which you have installed SharePoint 2010.
 
Path to get DLL's: C:\Program Files\Common Files\Microsoft Shared\Web Server Extensions\14\ISAPI
 
The SharePoint Foundation 2010 managed client object model consists of two assemblies that contain five namespaces. If you look at the classes available in those namespaces, you see many classes. Primarily classes that have direct counterparts to some familiar classes in the SharePoint Foundation server object model.
 
Following table shows you Client Side classes those are similar to Server Object Model:
 
 
Client Object Model Classes Server Object Model Classes
ClientContext SPContext
Site SPSite
Web SPWeb
List SPList
ListItem SPListItem
Field SPField
  1. Code snippets for How to Load List and List items:
public void LoadList()
        {
            using (SP.ClientContext ctx = new SP.ClientContext("SharePointSiteURL"))
            {
                var web = ctx.Web;

               // Let's only work with the specific List object and save resources
                // by not fetching any other objects
                var list = ctx.Web.Lists.GetByTitle("ListName");
 
                // Load only the list variable and execute the query
                ctx.Load(list);
                ctx.ExecuteQuery();
 
                SP.CamlQuery camlQuery = new SP.CamlQuery();
                 camlQuery.ViewXml =
                            @"<View>
                        <Query>
                                  <Where>
                                <Eq>
                                  <FieldRef Name='Name'/>
                                  <Value Type='Text'>Shailesh</Value>
                                </Eq>
                                  </Where>
                        </Query>
                              </View>";
                SP.ListItemCollection listItems = list.GetItems(camlQuery);
                ctx.Load(listItems);
                ctx.ExecuteQuery();
 
                //Now you can iterate listitems collection and can get listitems using foreach loop
 
                foreach (SP.ListItem listItem in listItems)
                {
                            //you can get value of list column from listitem as follow:
                            //listitem["ID"]
                        //listitem["Name"]
                }
            }
        }
  2. Code snippets for How to insert  List items to a List:
public void SaveListItem()
        {
            using (SP.ClientContext ctx = new SP.ClientContext("SharePointSiteURL"))
            {
                var web = ctx.Web;
                var list = ctx.Web.Lists.GetByTitle("ListName");
                ctx.Load(list);
                ctx.ExecuteQuery();
                SP.ListItemCreationInformation itemCreateInfo = new SP.ListItemCreationInformation();
                SP.ListItem listItem = list.AddItem(itemCreateInfo);
                listItem["Name"] = "Shailesh";
                listItem["Surname"] = "Soni";
                listItem.Update();
               ctx.ExecuteQuery();
            }
        }
  3. Code snippets for update List items in List:
Public  void UpdateListItem()
        {
            using (SP.ClientContext ctx = new SP.ClientContext("SharePointSiteURL"))
            {
                var web = ctx.Web;

               // Let's only work with the specific List object and save resources
                // by not fetching any other objects
                var list = ctx.Web.Lists.GetByTitle("ListName");
 
                // Load only the list variable and execute the query
                ctx.Load(list);
                ctx.ExecuteQuery();
 
                SP.CamlQuery camlQuery = new SP.CamlQuery();
                 camlQuery.ViewXml =
                            @"<View>
                        <Query>
                                  <Where>
                                <Eq>
                                  <FieldRef Name='Name'/>
                                  <Value Type='Text'>Shailesh</Value>
                                </Eq>
                                  </Where>
                        </Query>
                              </View>";
                SP.ListItemCollection listItems = list.GetItems(camlQuery);
                ctx.Load(listItems);
                ctx.ExecuteQuery();
 
                //Now you can iterate listitems collection and can get listitems using foreach loop
 
                foreach (SP.ListItem listItem in listItems)
                {
                             listitem["Address"] = “blah blah blah”;
                            listitem.Update();
                }
                ctx.ExecuteQuery();
            }
        }
  4. Code snippets for delete List items in List:
Public  void DeleteListItem()
        {
            using (SP.ClientContext ctx = new SP.ClientContext("SharePointSiteURL"))
            {
                var web = ctx.Web;

               // Let's only work with the specific List object and save resources
                // by not fetching any other objects
                var list = ctx.Web.Lists.GetByTitle("ListName");
 
                // Load only the list variable and execute the query
                ctx.Load(list);
                ctx.ExecuteQuery();
 
                SP.CamlQuery camlQuery = new SP.CamlQuery();
                 camlQuery.ViewXml =
                            @"<View>
                        <Query>
                                  <Where>
                                <Eq>
                                  <FieldRef Name='Name'/>
                                  <Value Type='Text'>Shailesh</Value>
                                </Eq>
                                  </Where>
                        </Query>
                              </View>";
                SP.ListItemCollection listItems = list.GetItems(camlQuery);
                ctx.Load(listItems);
                ctx.ExecuteQuery();
 
                //Now you can iterate listitems collection and can get listitems using foreach loop
                foreach (SP.ListItem listItem in listItems)
                            listItem.DeleteObject();
                ctx.ExecuteQuery();
            }
        }
 Conclusion: The above code snippets and detail description will help you to understand Client Object Model to begin with SharePoint 2010.
Reference:

http://weblogs.asp.net/shailesh/sharepoint-2010-introduction-to-client-object-model