Create Custom Master Page in SharePoint Designer 2010 step by step
1 Create Web Application
Create a
web application where we will make some
modifications. Choose any name for it, and be sure that it works correctly. I
created mine in my test environment
http://master.Spdev.local:888
You don’t have to fill this page with any data or document since we will only
change the style of this page.
2 SharePoint Designer
SharePoint Designer is used for the management of SharePoint sites and lists,
for creating and managing internal and external data sources, creating views and
forms to work with data, creating workflows in order to represent business
processes and finally SharePoint Designer is used for branding sites by
customizing the look feel.
SharePoint Designer 2010 can be downloaded for free from Microsoft while
SharePoint Designer 2007 wasn’t free of charge at the release of SharePoint 2007
which changed during time. While SharePoint Designer 2007 offered you the
ability to edit SharePoint and non-SharePoint sites this has changed with the
version published in 2010: You can only edit SharePoint 2010 sites using
SharePoint Designer 2010.
SharePoint Designer 2010 is available in a 32bit and a 64bit version. If you
intend to use SharePoint Designer 2007 besides the 2010 version you need to
install the 32bit version of SharePoint Designer 2010.
One major complaint with the 2007 version was the difficult lockdown of
SharePoint Designer 2007 which has changed with SharePoint Designer 2010: You
can now easily manage the capabilities at the web application or site collection
level.
2.1 SharePoint Designer 2010 download
Here are the downloads including Service Pack 1:
3 Install SharePoint Designer
The first step in this process of course, is to get SharePoint Designer
installed. To do so, I am starting from the first site I have created in my new
environment.
Since
I do not already have Designer 2010 installed, a dialog window pops up,
basically letting me know that I do not have it installed, and I can do so. Just
like SharePoint Designer 2007, SharePoint Designer 2010 will be free for all
users. And since the Beta is all that is around now, that’s what it will install
for me
I select the language I want to install SharePoint Designer in (German,
Spanish, Japanese, French, Russian, and Chinese are other available languages
that can be selected, in addition to English, as shown above), and choose my
platform. Even though SharePoint 2010 is only 64-bit, SharePoint Designer 2010
is available in both 32 and 64 bit, as it is intended to be run from the
desktop, and many of us still run 32 bit desktops, as we probably will for a
long time to come.
Once done, selecting the
Download button goes out and
fetches the right download, and prompts me to run and/or save it.
It’s sizeable for my options as I've chosen (English 64-bit) at 277MB, so I'm
happy that I have a nice and fast connection.
Once it’s up and running, the installer will extract the files, and then move
on.
You have the usual EulA; agree and continue
Once accepted, you really cannot miss what is needed on the next screen.
Microsoft made sure of that.
However, you can customize your installation by clicking on the
Customize button, setting a new installation directory, setting
your user information, and adding or removing features from the install. With
the default installation, it’s a fairly hefty installation at 1.03G, but, I have
a feeling it will be well worth it…
The installation begins (of course after you have clicked the
Install
Now button). And that’s it. You’re done!
4 Basic Designs
4.1 Active features
Where do you set the master page / page layouts if you create a Team Site /
non publishing site collection? Well, Microsoft obviously knew that people would
want to use the publishing features with the non-publishing enabled site
collections, so this is an example of where the feature framework really works
well. To resolve the “problem” simply complete the following steps:
- Navigate to the landing page of your newly created site collection
- Click on “Site Actions”
- Click on “Site Collection Features”
- Enable “SharePoint Server Publishing Infrastructure”
Enable on site collection level
- Click on “Site Actions”
- Click on “Manage site features”
- Enable “SharePoint Server Publishing”
Enable on a site level
Once completed, you can again access the master pages and page layouts via
site settings as you would normally do for a publishing portal.
4.2 Leave Default Master Pages in Peace
SharePoint 2010 comes with three out-of-box Master Pages – v4.master (the
default SP2010 design), is the default.master In this tutorial we will create a
new masterpage using the v4.master as a template and then connect the newly
created custom Master Page to our site. It is a good idea to leave the default
Master Pages untouched (at least for the examples in this post).
First we need to clone the v4.master file. Open SharePoint Designer 2010, and
from the
Sites tab select the
Open Site icon
and enter your site URL.
The site root will be opened in SharePoint Designer 2010. Now select
Master Pages from the left menu, click on the
v4.master file and press CTRL+C and CTRL+V to create a copy of
the .master file.
Name your master page – click on the
Rename icon in the
ribbon and enter your custom name (for example myCustom.master).
Using the newly created master page we are now ready to make the
modifications. Users of your SharePoint site will not notice that we are
changing anything, and if you break something – it will be the custom master
page, not the one users are seeing.
4.3 Create a Custom CSS to Add Branding
Next we need a CSS file which overrides the default core4.css style
definitions. To see some changes to our customizations, we will include the
fixed width style for our new master page.
Open SharePoint Designer 2010, select
All files from the
left menu and then enter the
Style library.
To create a new css file, right click on the
Style Library
and select
New >
CSS from menu.
Name this file
myCustom.css, just to keep the naming schema
consistent with our custom Master Page.
Right click the newly created .css file and select the
Edit file in
Advanced Mode option.
Now enter some code in the css file. One thing we will do in this tutorial is
to render the SharePoint site with a fixed width of 1024 pixels (making a site
fixed width is actually a very difficult task using just SharePoint 2010).
Additionally, we will also change the ribbon background color and the site
background color.
Enter the following code in your css file:
|
width: 1024px !important; |
|
background-color:#865102;
|
|
width: 1024px !important; |
|
.ms-cui-ribbonTopBars > div {
|
|
border-bottom:1px solid transparent !important;
|
We now have a custom CSS in the Style Library and a custom Master Page. Now
we need to associate the css file with the custom Master Page.
Open the myCustom.master file with SharePoint Designer (in advanced editing
mode). You will see the site preview, because by default it will open your
Master Page on the
Design tab.
Click the
Code tab on the bottom of the editor. You will see
the entire Master Page code and content, with many placeholders, Server Ribbon
code etc. Fortunately, you don’t have to learn all of these to do some serious
branding and modification.
First, we need to connect our Master Page with the css file. Within the
<head> tag, we need to add a link to our custom CSS file:
<link href=”/Style%20Library/myCustom.css” rel=”stylesheet”
type=”text/css” />
Now modify the s4-workspace area so it will read our css file properly:
Find the line:
<div id=”s4-workspace”>
and replace it with:
<DIV id=”s4-workspace” class=”s4-nosetwidth”>
This will add the class attribute to s4-workspace tag. Without this, our
fixed size setting in the CSS file will be overridden by the default inline
CSS.
Now we can test our Master Page, before we link it to our production site.
The best way is to create a new test page from the selected Master Page. Go back
to the
Master Pages item in the left menu, and right-click our
myCustom.master file, then select the
New from Master Page
option.
Give the site a name such as myCustom_Site and select where it should be
created – the default
Site Pages is fine.
After a while a new page will be created and SharePoint Designer will open it
for editing (in code view). Click the
Preview icon on the
ribbon to see your changes.
4.4 Going Live with Your Custom SharePoint Master Page
If we have ensured that the newly created Master Page looks fine we can now
connect it with our live production SharePoint site.
Open SharePoint Designer 2010, navigate to the
Master Pages option in the
left menu, right click the
myCustom.master file and select
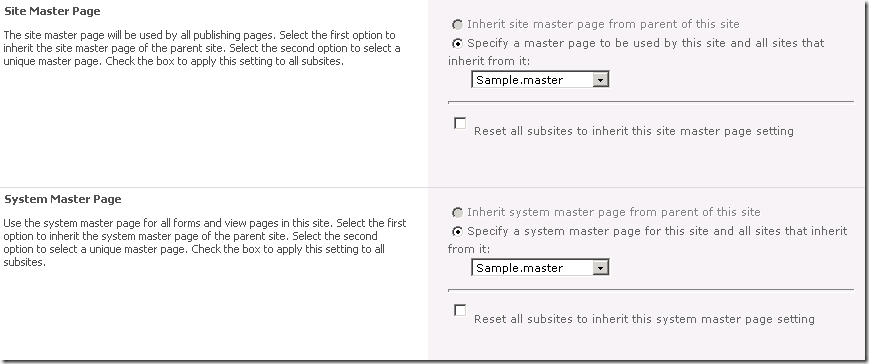
Set as default Master Page.
Now, if you go to your main site (in my SP farm it’s
http://master.spdev.local:888/) you should see the changed layout
Reference
https://www.nothingbutsharepoint.com/sites/eusp/pages/create-custom-css-and-master-page-in-sharepoint-2010.aspx


